


ZStack Cloud Platform
Single Server, Free Trial for One Year

Comprehensive product documentation and tools

Upholding the value of Customer First and the mission of Serving Customer, ZStack is dedicated to providing secure and stable services for customers.

To educate ZStack partners and interested individuals about cloud computing and to cultivate cloud computing talent.

ZStack provides innovative cloud infrastructure for ten major industries

The report provides three major
solutions and customer case studies for transitioning from VMware to ZStack.
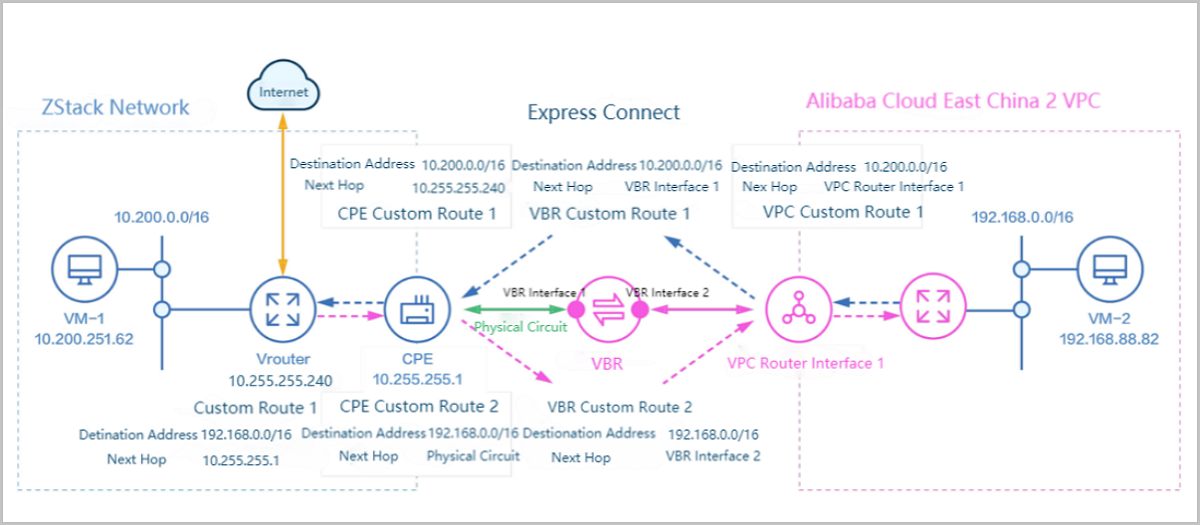
ZStack Cloud allows you to create an Alibaba Cloud express connect to enable the intercommunication between the VPC networks in local data center and on Alibaba Cloud.
ping each other. If so, the express connect is created successfully. Note: The CIDRs from the local VPC vRouter to Alibaba Cloud VPC, which use the express connect to realize the intercommunication, cannot overlap with each other.
| Public Network | Configuration |
|---|---|
| NIC | em01 |
| VLAN ID | NoVLAN |
| IP Range | 172.20.58.180~172.20.58.189 |
| Netmask | 255.255.0.0 |
| Gateway | 172.20.0.1 |
| Note | Private Cloud VM instance can use this network to access the Internet. |
| Physical Circuit Network | Configuration |
|---|---|
| NIC | em02 |
| VLAN ID | NoVLAN |
| IP Range | 10.255.255.230~10.255.255.240 |
| Netmask | 255.255.255.0 |
| Gateway | 10.255.255.1 |
| Note | A new network. Private Cloud VM instances use this network to access Alibaba Cloud ECS instances. |
| VPC | Configuration |
|---|---|
| NIC | em01 |
| VLAN ID | 2984 |
| IP CIDR | 10.200.0.0/16 |
 Note: Note:
 ping each other. ping the ECS instance. ping ECS Instance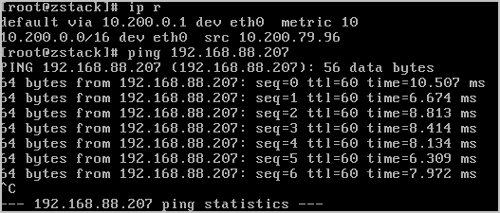
ping the local VM instance. ping Local VM Instance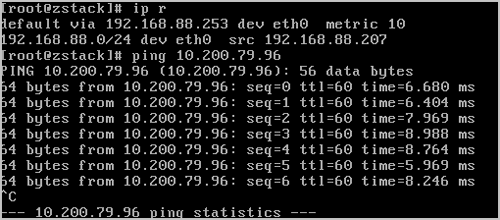
Now, you create an express connect successfully and can use it to enable the intercommunication between ZStack CloudPrivate Cloud VM instances and Alibaba Cloud ECS instances.


