ZStack Cloud Platform
Single Server, Free Trial for One Year

Comprehensive product documentation and tools

Upholding the value of Customer First and the mission of Serving Customer, ZStack is dedicated to providing secure and stable services for customers.

To educate ZStack partners and interested individuals about cloud computing and to cultivate cloud computing talent.

ZStack provides innovative cloud infrastructure for ten major industries

The report provides three major
solutions and customer case studies for transitioning from VMware to ZStack.
ZStack Cloud VPC network supports both IPv4 and IPv6 protocols and users can choose to use IPv4, IPv6, or IPv4+IPv6 dual-stack networks as needed. This chapter introduces the basic deployment of IPv4 and IPv6 VPC networks in detail.
IPv4, also known as the Internet Protocol version 4, with a 32-bit long address, is the most widely used version of the inter-networking protocol today. ZStack Cloud VPC network supports IPv4 protocol and this chapter will introduce the basic deployment of IPv4 VPC network in detail.
| Public Network | Configuration |
|---|---|
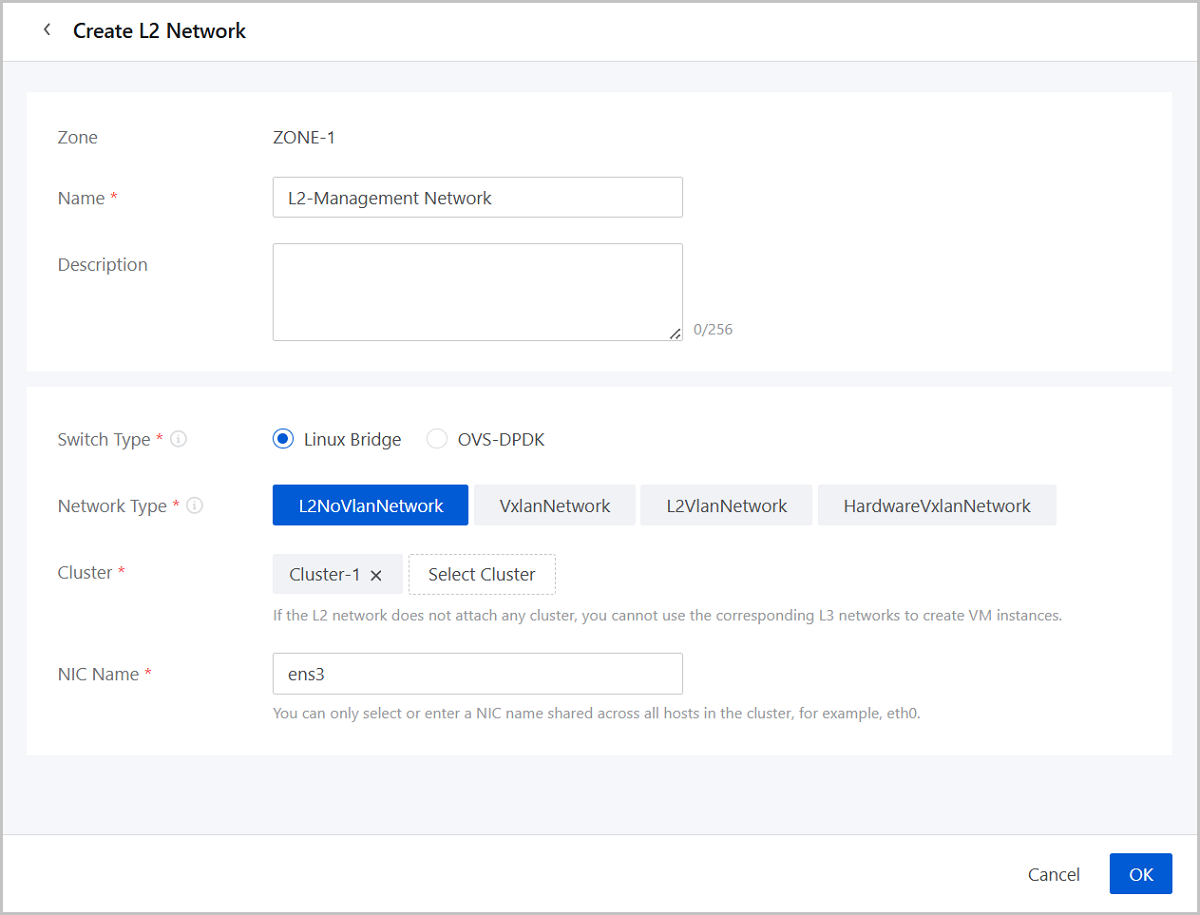
| NIC | em1 |
| VLAN ID | No VLAN |
| IP Range | 10.108.10.100~10.108.10.200 |
| Netmask | 255.0.0.0 |
| Gateway | 10.0.0.1 |
| DHCP IP | 10.108.10.101 |
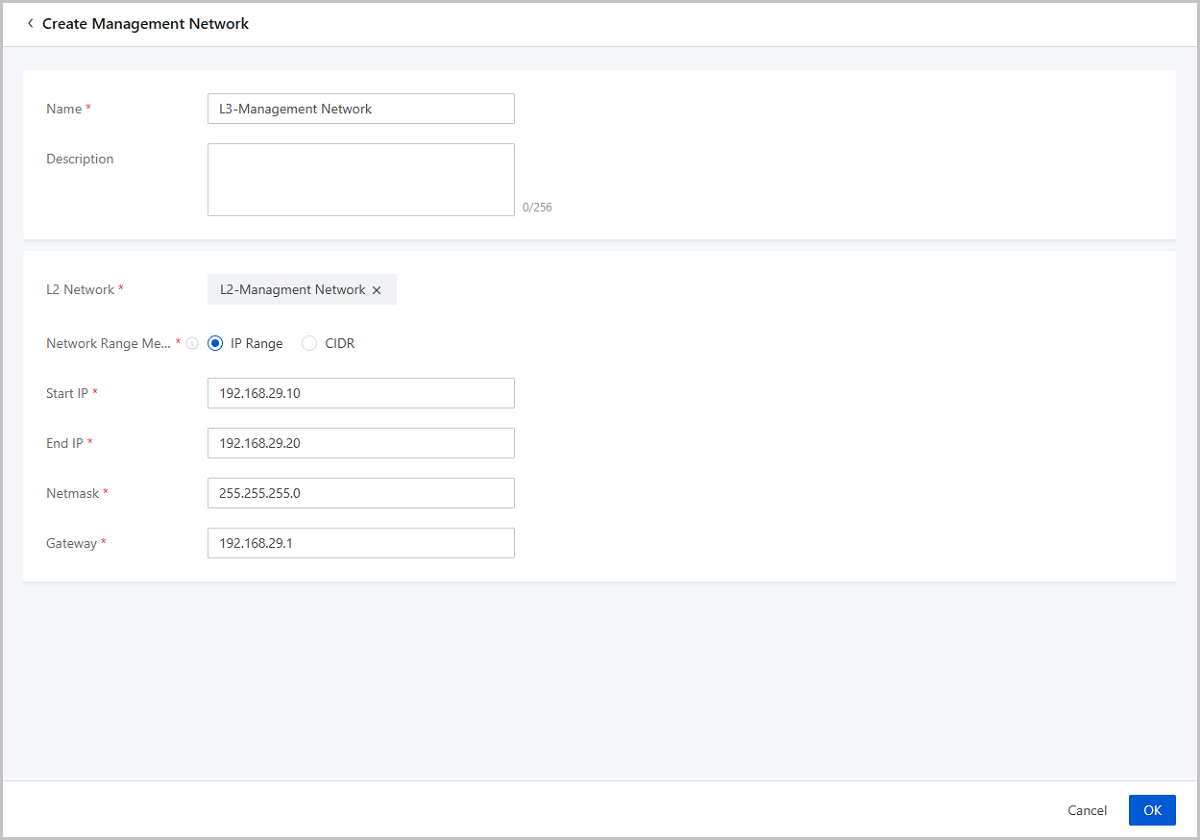
| Management Network | Configuration |
|---|---|
| NIC | em2 |
| VLAN ID | No VLAN |
| IP Range | 192.168.29.10~192.168.29.20 |
| Netmask | 255.255.255.0 |
| Gateway | 192.168.29.1 |
 Note:
Note: | Private Network | Configuration |
|---|---|
| NIC | em1 |
| VLAN ID | 2800 |
| IP CIDR | 192.168.10.0/24 |
| Gateway | 192.168.10.1 |
| DHCP IP | 192.168.10.2 |
| Private Network | Configuration |
|---|---|
| NIC | em1 |
| VLAN ID | 2900 |
| IP CIDR | 192.168.11.0/24 |
| Gateway | 192.168.11.1 |
| DHCP IP | 192.168.11.2 |
For network configuration information, see Public Network configuration.

For network configuration information, see Public Network configuration.
Note: Note: 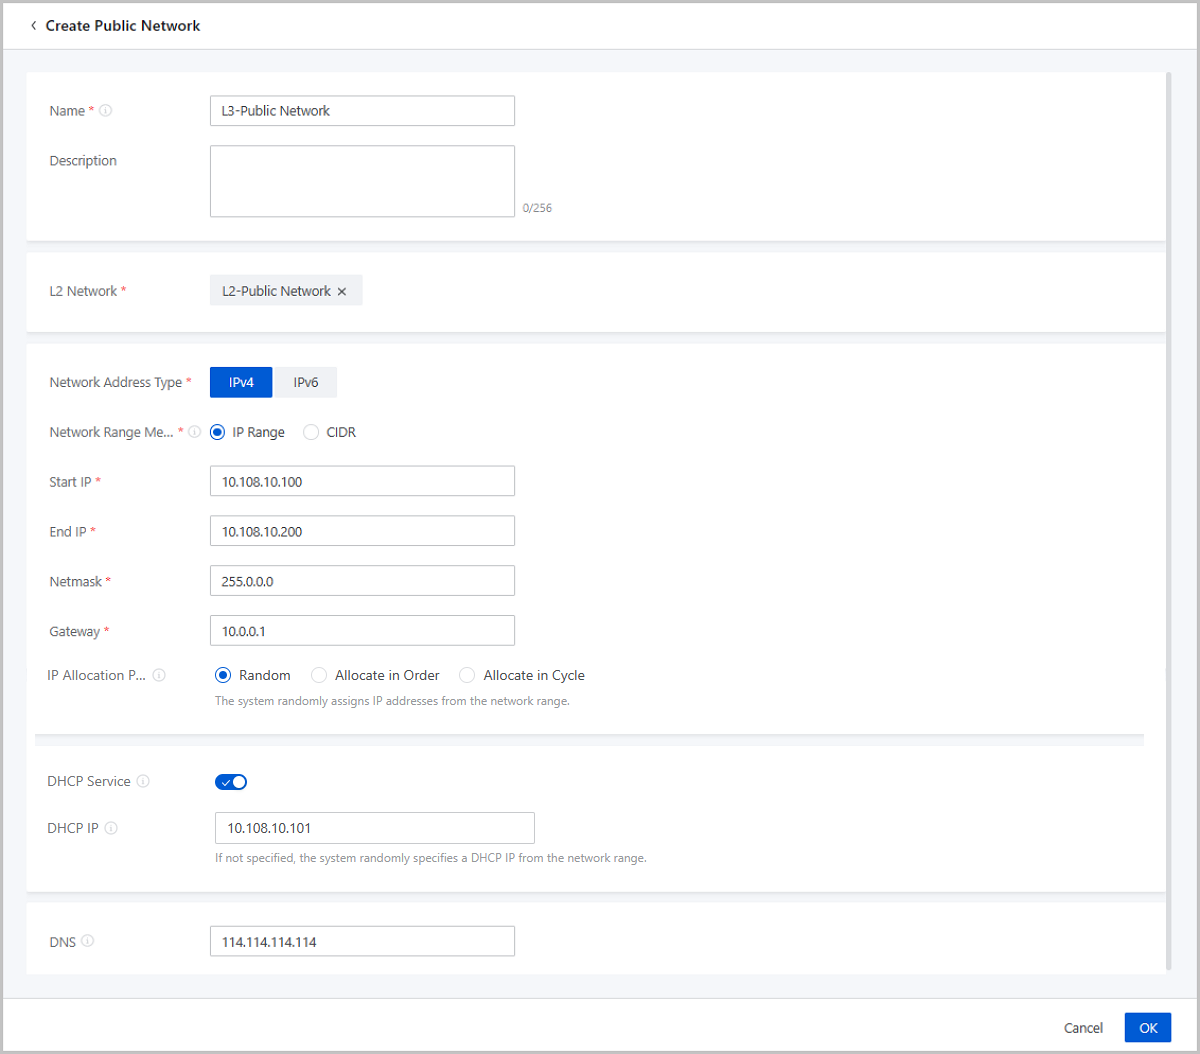
For network configuration information, see Management Network Configuration.
For network configuration information, see Management Network Configuration.
On the main menu of ZStack Cloud, choose . On the vRouter Image page, click Add vRouter Image. Then, the Add vRouter Image page is displayed.
Note: Note: Currently, a vRouter can have up to 240 CPU cores. In an actual production environment, we recommend that you set more than 8 CPU cores for a vRouter.Note: If the L3 public network in the vRouter offering has a network range of the IPv6 type, when you create a VPC vRouter, you must use the vRouter image of version 3.10.0 or later.
On the main menu of ZStack Cloud, choose . On the VPC vRouter page, click Create VPC vRouter. Then, the Create VPC vRouter page is displayed. On the displayed page, set the following parameters:
Note: A VPC vRouter created from a vRouter offering has a public network and a management network.Note: Note: To assign a management network IP, make sure that the management network used by the VPC vRouter is separated from the public network the VPC vRouter uses. If the VPC vRouter uses a same network both as its management network and public network, you cannot assign a management network IP.Note: Note: 
For network configuration information, see VPC Network-1 Configuration.

For network configuration information, see VPC Network-1 Configuration.
Note: Note: 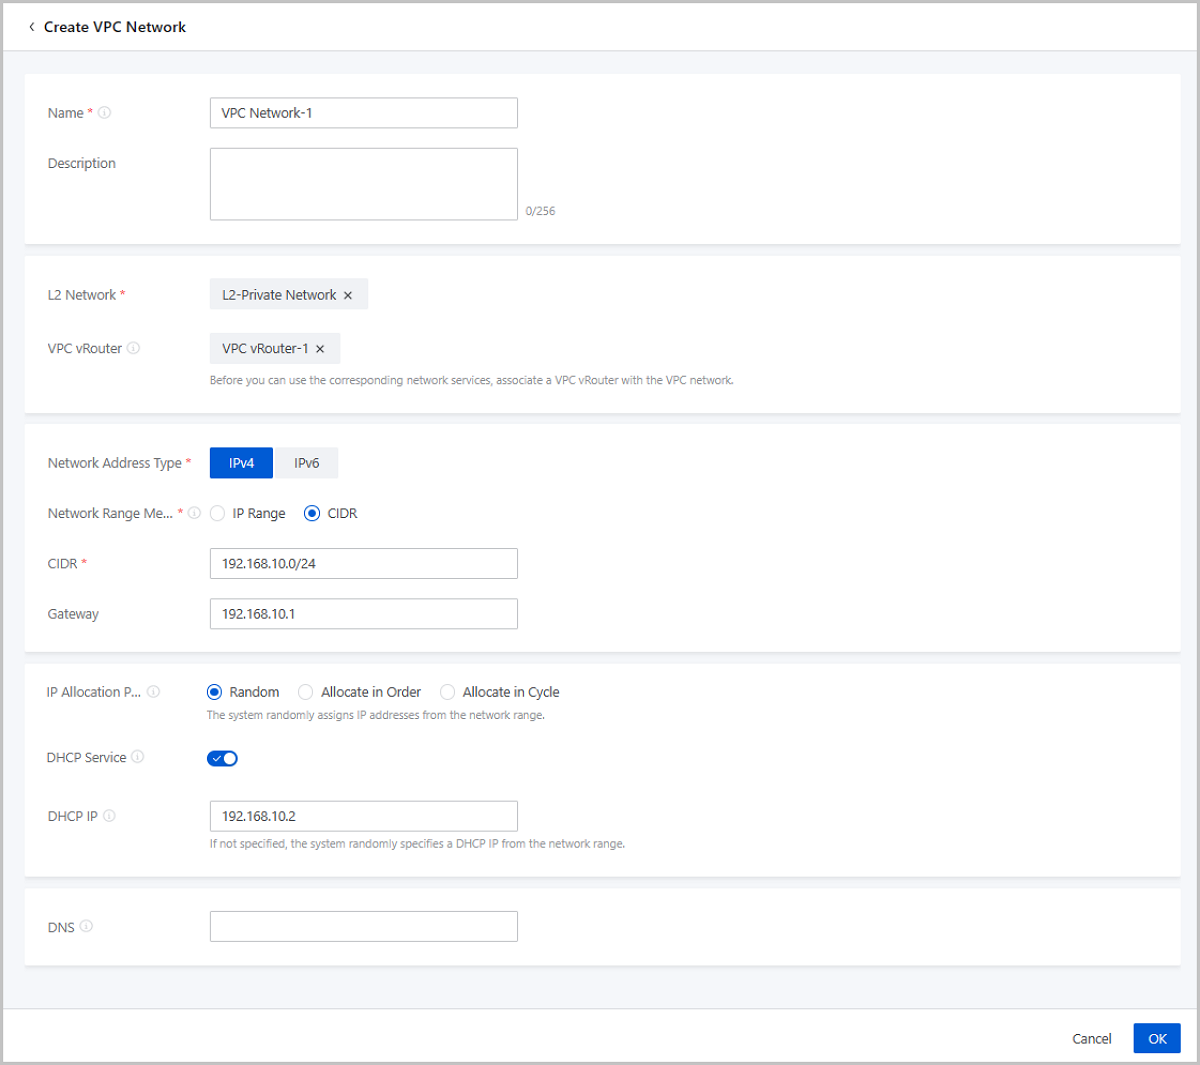
On the main menu of ZStack Cloud, choose . Click Create VM Instance. Use the existing VPC Network-1 and VPC Network-2 to create VM-1 and VM-2, respectively.
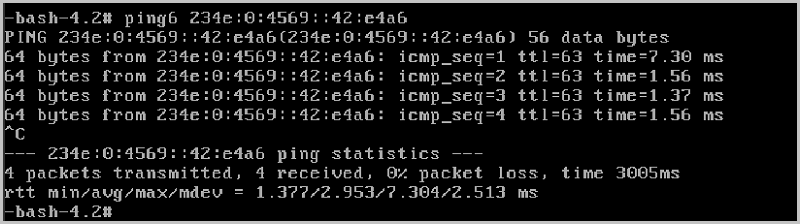
Expected result: VPC Netowrk-1 and VPC Network-2 can communicate with each other.
ping command to ping VM-2.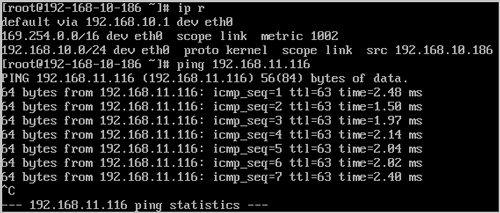
ping command to ping VM-1.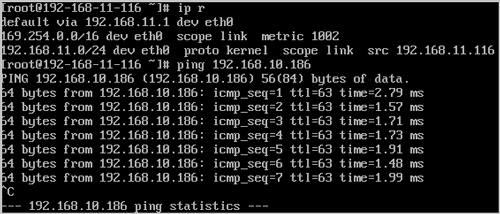
IPv6, also known as Internet Protocol version 6, with an address length of 128 bits, not only solves the problem of insufficient IPv4 address, but it also clears the barrier for multiple access devices to connect to the Internet. ZStack Cloud VPC network supports IPv6 protocol and this chapter will introduce the basic deployment of IPv6 VPC network in detail.
| Public Network | Configuration |
|---|---|
| NIC | em1 |
| VLAN ID | No VLAN |
| IP Range | 10.108.10.100~10.108.10.200 |
| Netmask | 255.0.0.0 |
| Gateway | 10.0.0.1 |
| DHCP IP | 10.108.10.101 |
Note: The public network used to create the VPC vRouter supports both IPv4 and IPv6 networks. In this scenario, we use IPv4 as an example.| Management Network | Configuration |
|---|---|
| NIC | em2 |
| VLAN ID | No VLAN |
| IP Range | 192.168.29.10~192.168.29.20 |
| Netmask | 255.255.255.0 |
| Gateway | 192.168.29.1 |
Note: | VPC Network | Configuration |
|---|---|
| NIC | em1 |
| VLAN ID | 2800 |
| IP CIDR | 234e:0:4569::/64 |
| DHCP IP | 234e:0:4569::2 |
| VPC Network | Configuration |
|---|---|
| NIC | em1 |
| VLAN ID | 2900 |
| IP CIDR | 234e:0:456a::/64 |
| DHCP IP | 234e:0:456a::2 |
For network configuration information, see Public Network Configuration.
For network configuration information, see Public Network Configuration.
Note: Note: For network configuration information, see Management Network Configuration.
For network configuration information, see Management Network Configuration.
On the main menu of ZStack Cloud, choose . On the vRouter Image page, click Add vRouter Image. Then, the Add vRouter Image page is displayed.
Note: Note: Currently, a vRouter can have up to 240 CPU cores. In an actual production environment, we recommend that you set more than 8 CPU cores for a vRouter.Note: If the L3 public network in the vRouter offering has a network range of the IPv6 type, when you create a VPC vRouter, you must use the vRouter image of version 3.10.0 or later.Note: To assign a management network IP, make sure that the management network used by the VPC vRouter is separated from the public network the VPC vRouter uses. If the VPC vRouter uses a same network both as its management network and public network, you cannot assign a management network IP.Note: Note: 
For network configuration information, see VPC Network-1 Configuration.

Similarly, Create L2-VPC-2 and attach it to the corresponding cluster.
For network configuration information, see VPC Network-1 Configuration.
Note: Note: 
Similarly, create L3-VPC-2 and attach it to the VPC vRouter.
On the main menu of ZStack Cloud, choose . Click Create VM Instance. Use the existing L3-VPC-1 and L3-VPC-2 to create VM-1 and VM-2, respectively.
[root@localhost~]# dhclient -6 eth0 //eth0 indicates the NIC name [root@localhost~]# ifconfig
Expected result: L3-VPC-1 and L3-VPC-2 can communicate with each other.
ping command to ping VM-2.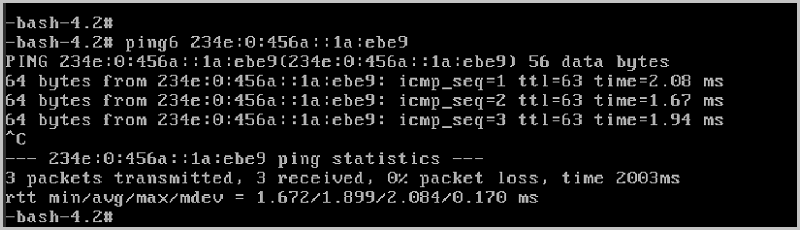
ping command to ping VM-1.