ZStack Cloud Platform
Single Server, Free Trial for One Year
Comprehensive Data Center Infrastructure Solutions.
4S-compliant productized private cloud and seamless hybrid cloud
Offer a user experience consistent with VMware virtualization
A robust catalog of ready-to-deploy product
Supports storage resource pools with capacities exceeding PB levels
Covering scenarios from core to edge, cloud to cloud- native, and data management to AI
Deploy ZStack for scenario from datacenter to the edge.
ZStack provides innovative cloud infrastructure for ten major industries.
Comprehensive product documentation and tools
Upholding the value of Customer First and the mission of Serving Customer, ZStack is dedicated to providing secure and stable services for customers.
To educate ZStack partners and interested individuals about cloud computing and to cultivate cloud computing talent.
ZStack provides innovative cloud infrastructure for ten major industries
The report provides three major
solutions and customer case studies for transitioning from VMware to ZStack.
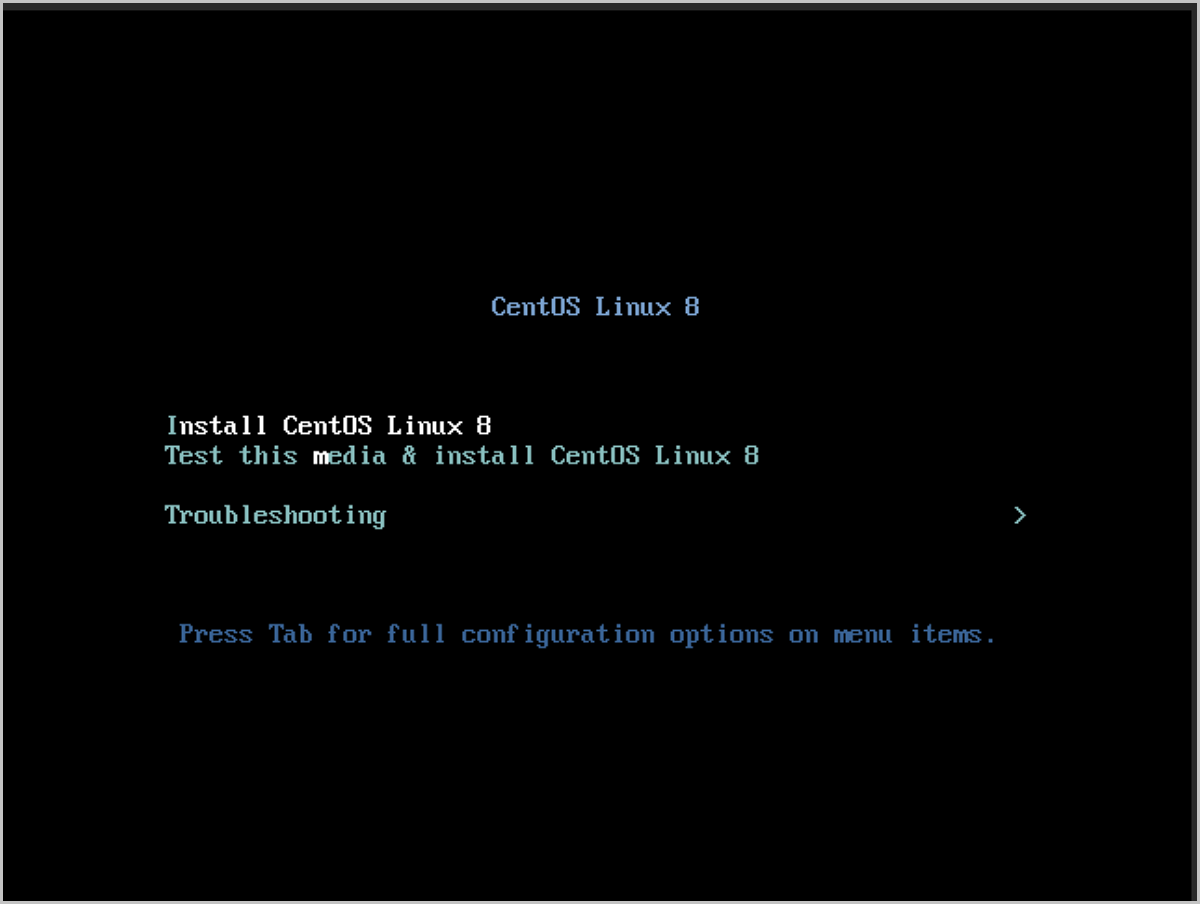
Launch the VM console, and the CentOS 8 installation page appears. Then, select Install CentOS Linux 8 to begin the operating system installation.
This tutorial chooses English as the default language for the installer and the system. You can choose other languages as needed.
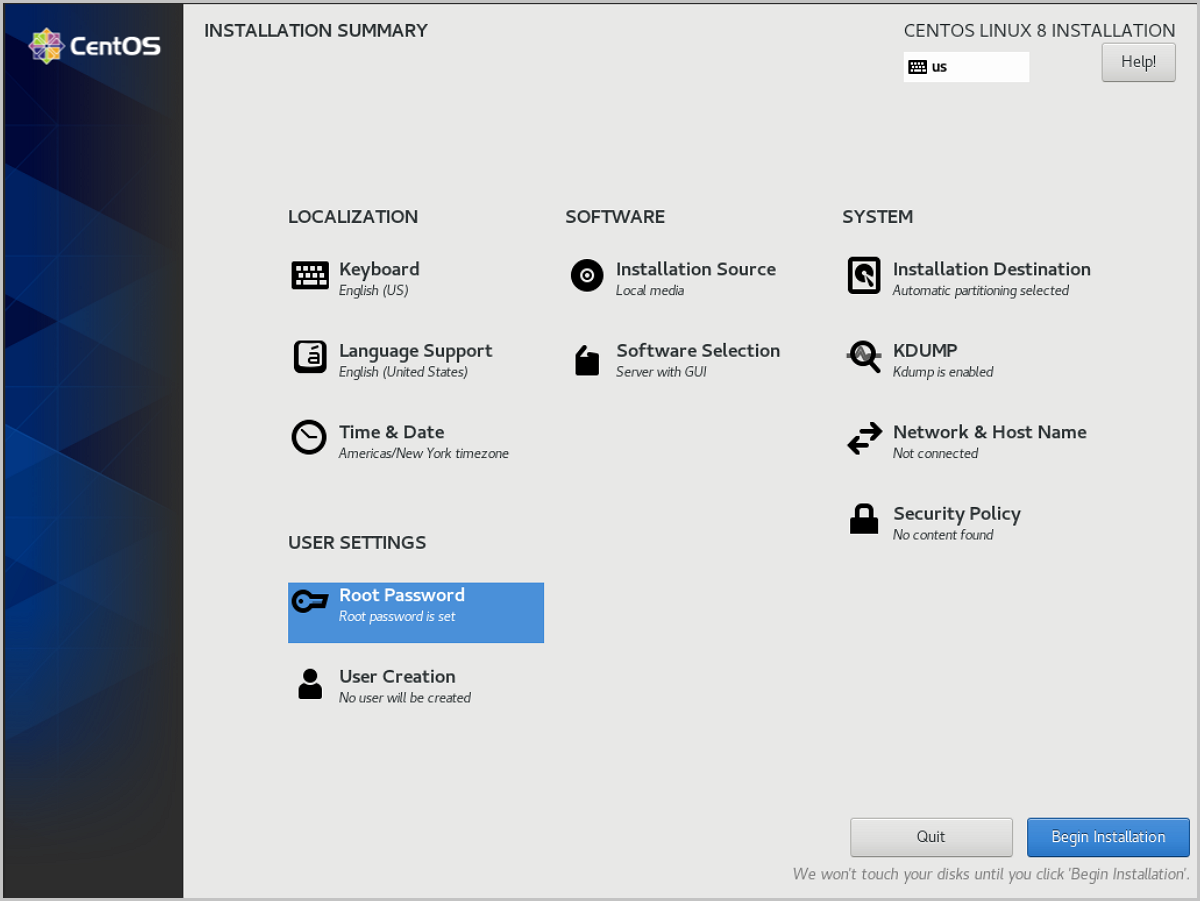
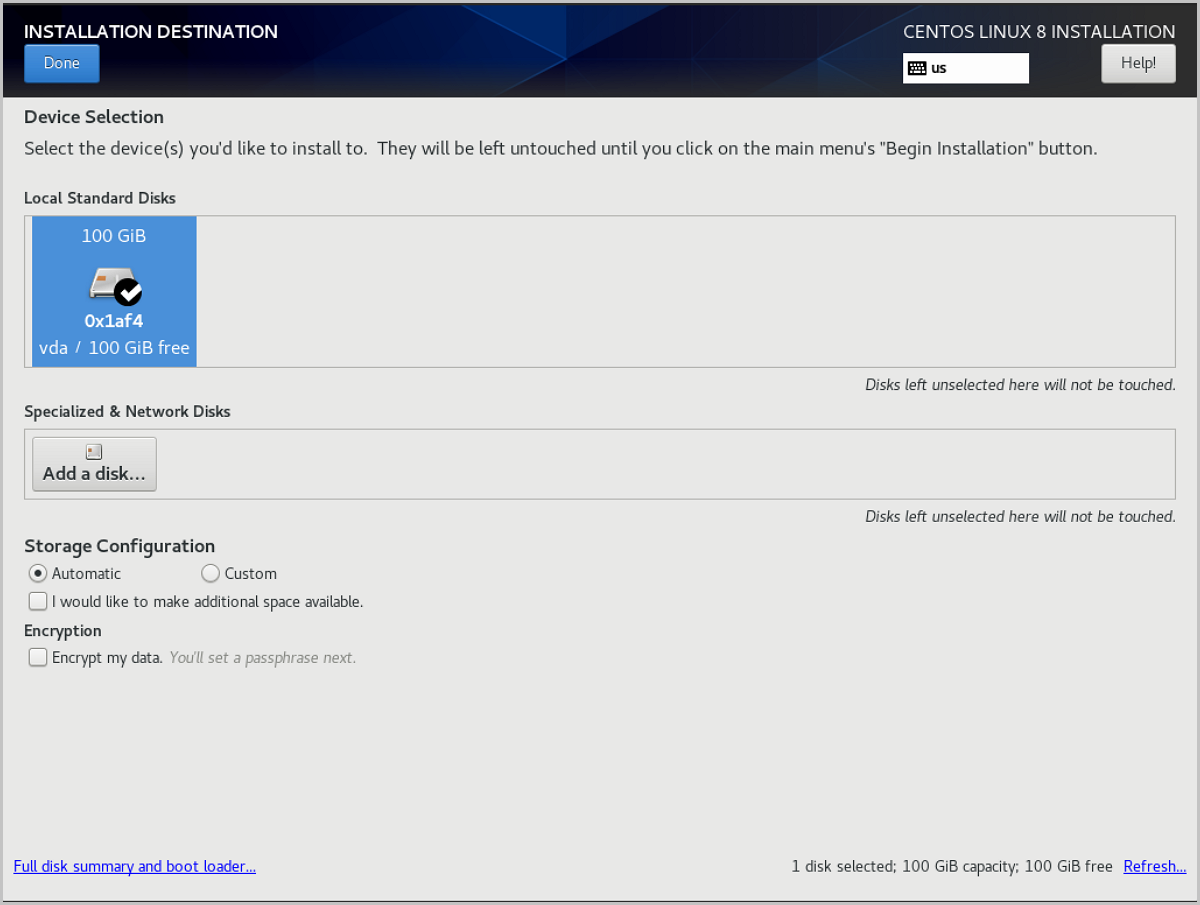
This tutorial selects Automatically configure partitioning to complete the installation. If you want to customize partitioning, click INSTALLATION DESTINATION on the INSTALLATION SUMMARY page, and begin customized configuration on the INSTALLATION DESTINATION page.
After finishing disk partitioning, go back to the INSTALLATION SUMMARY page, and click Begin Installation at the bottom right of the page to begin system installation. After finishing system installation, click Reboot to restart the system. Then, click I accept the license agreement to enter the system.
In the CentOS 8, run hostnamectl set-hostname localhost.localdomain && bash
. This command specifies the hostname of the VM instance created with the template as the IP address of the NIC.
[root@localhost ~]# sed -i '/ONBOOT=/cONBOOT=yes' /etc/sysconfig/network-scripts/ifcfg-ens3 #Set the NIC to be activated automatically at boot [root@localhost ~]# sed -i '/^UUID'/d /etc/sysconfig/network-scripts/ifcfg-ens3 #Delete the UUID in the NIC configuration file [root@localhost ~]# sed -i '/^HWADDR'/d /etc/sysconfig/network-scripts/ifcfg-ens3 #Delete the MAC in the NIC configuration file
yum install qemu-guest-agent -y
to install the QGA. systemctl enable qemu-guest-agent
to enable the QGA whenever the VM instance starts. vi /etc/selinux/config
to change the status of SELINUX to disabled. Then, save the change and exit. ssh_pwauth
as 1
.[root@localhost ~]# mkdir /mnt/cdrom #Create a monut point. [root@localhost ~]# mount /dev/cdrom /mnt/cdrom #Attach CD-ROM image. [root@localhost ~]# cd /mnt/cdrom/ bash ./zs-tools-install.sh #Install GuestTools. [root@localhost ~]# cd ~ umount /mnt/cdrom #Unmount CD-ROM (optional).
[root@localhost ~]# echo "mount -t ext4 -U "d0shC2-2GO1-Vyuc-XKXf-Pb3c-uvG5-92Fzeu" /mnt" >> /etc/rc.d/rc.local [root@localhost ~]# # -t indicates the file system of the disk; -U indicates using UUID to attach the disk;/mnt indicates the mount path [root@localhost ~]# # run blkid to obtain the device UUID [root@localhost ~]# chmod +x /etc/rc.d/rc.local [root@localhost ~]# # We recommend you to attach the disk with the device UUID instead of the disk symbol such as /dev/vdb.
grep . /sys/devices/system/cpu/vulnerabilities/*
. You can check whether the patch is on by viewing /sys. For example: # grep . /sys/devices/system/cpu/vulnerabilities/* /sys/devices/system/cpu/vulnerabilities/itlb_multihit:KVM: Mitigation: Split huge pages /sys/devices/system/cpu/vulnerabilities/l1tf:Mitigation: PTE Inversion; VMX: conditional cache flushes, SMT disabled /sys/devices/system/cpu/vulnerabilities/mds:Mitigation: Clear CPU buffers; SMT Host state unknown /sys/devices/system/cpu/vulnerabilities/meltdown:Mitigation: PTI /sys/devices/system/cpu/vulnerabilities/spec_store_bypass:Mitigation: Speculative Store Bypass disabled via prctl and seccomp /sys/devices/system/cpu/vulnerabilities/spectre_v1:Mitigation: usercopy/swapgs barriers and __user pointer sanitization /sys/devices/system/cpu/vulnerabilities/spectre_v2:Mitigation: Full generic retpoline, IBPB: conditional, IBRS_FW, STIBP: disabled, RSB filling /sys/devices/system/cpu/vulnerabilities/srbds:Not affected /sys/devices/system/cpu/vulnerabilities/tsx_async_abort:Mitigation: Clear CPU buffers; SMT Host state unknown
You can check the patch status through the last result returned. Mitigation means that the patch is on, while vulnerable means the patch is closed.
grub2-mkconfig > /boot/grub2/grub.cfg
to apply the configuration.[root@10-0-5-87 ~]# cat /etc/default/grub #view /etc/default/grub file configuration.Make configurations based on your needs. GRUB_TIMEOUT=5 GRUB_DISTRIBUTOR="$(sed 's, release .*$,,g' /etc/system-release)" GRUB_DEFAULT=saved GRUB_DISABLE_SUBMENU=true GRUB_TERMINAL_OUTPUT="console" GRUB_CMDLINE_LINUX="crashkernel=auto rd.lvm.lv=zstack/root rd.lvm.lv=zstack/swap rhgb quiet noibrs noibpb nopti spectre_v2=off nospectre_v1 l1tf=off nospec_store_bypass_disable no_stf_barrier mds=off mitigations=off" GRUB_DISABLE_RECOVERY="true" [root@10-0-5-87 ~]# grub2-mkconfig > /boot/grub2/grub.cfg #Apply the configuration [root@10-0-5-87 ~]# reboot #Restart the VM instance to make the configuration effective
On the details page of the VM instance created, choose Actions > Snapshot and Image > Create Image. Then, the Create Image page is displayed.
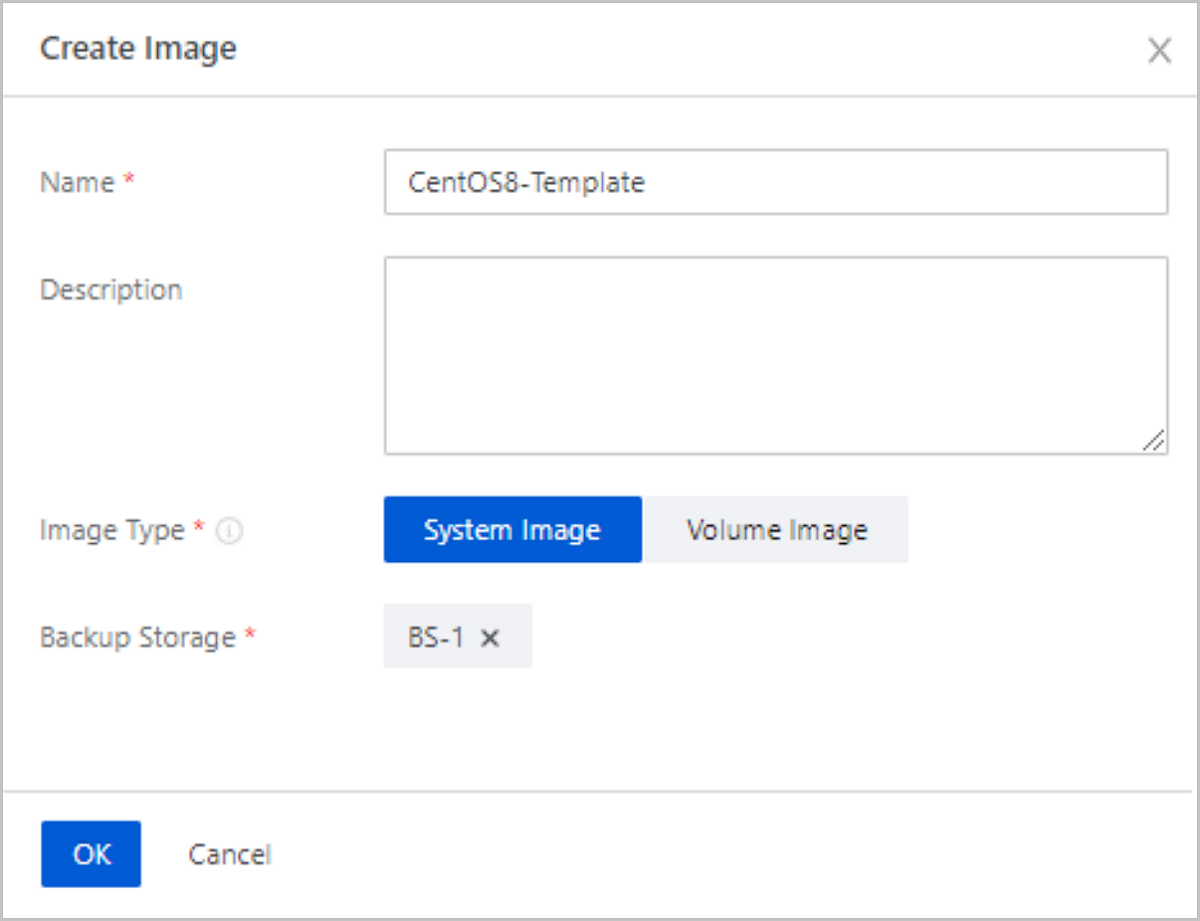
On the Image page, choose Actions > Export Image. This button helps export the image.
After generating the image, you can copy the URL of the image exported on the Overview page to download the image. Or, you can copy the URL of the exported image on the Exported page. You can also click Download on the page to download the image directly.
[root@ceph-node1 ~]# rbd export bak-t-cac5eee23a204c1a914d1743f1584644/7232237c0059409babcd1c7a69452b98 /root/export-test.qcow2 [root@ceph-node1 ~]# # bak-t indicates the installation path of the image [root@ceph-node1 ~]# # /root/export-test.qcow2 indicates the target path and the file name of the exported image
Download Document Archives