


ZStack Cloud Platform
Single Server, Free Trial for One Year

Comprehensive product documentation and tools

Upholding the value of Customer First and the mission of Serving Customer, ZStack is dedicated to providing secure and stable services for customers.

To educate ZStack partners and interested individuals about cloud computing and to cultivate cloud computing talent.

ZStack provides innovative cloud infrastructure for ten major industries

The report provides three major
solutions and customer case studies for transitioning from VMware to ZStack.
This chapter includes scenarios of local backup practice, remote backup practice, and Public Cloud backup practice.
Assume that you have deployed the latest ZStack Cloud environment on local and purchased both the Base License and the Plus License of Backup Service. Now, you plan to add a local backup server to backup VM instances with non-shared volumes. Assume that the data is backed up to a local backup server, and the service VM instance is mistakenly expunged, causing Web service interruption (http://192.168.1.1) and data loss. After you have recovered the data from the local backup server, the service and data are both back to normal.

| Local Backup Server | Configuration |
|---|---|
| Backup Server IP | 192.168.0.1 |
| Mount Path | /local_ds |
| SSH Port | 22 |
| User Name | root |
| Password | password |
| Backup Network | 192.168.0.0/24 |
On the main menu of ZStack Cloud, choose . On the Local Backup Sever page, click Add Local Backup Sever. Then, the Add Local Backup Sever page is displayed.
 Note: Make sure that the backup server uses an operating system consistent with that of the management node.
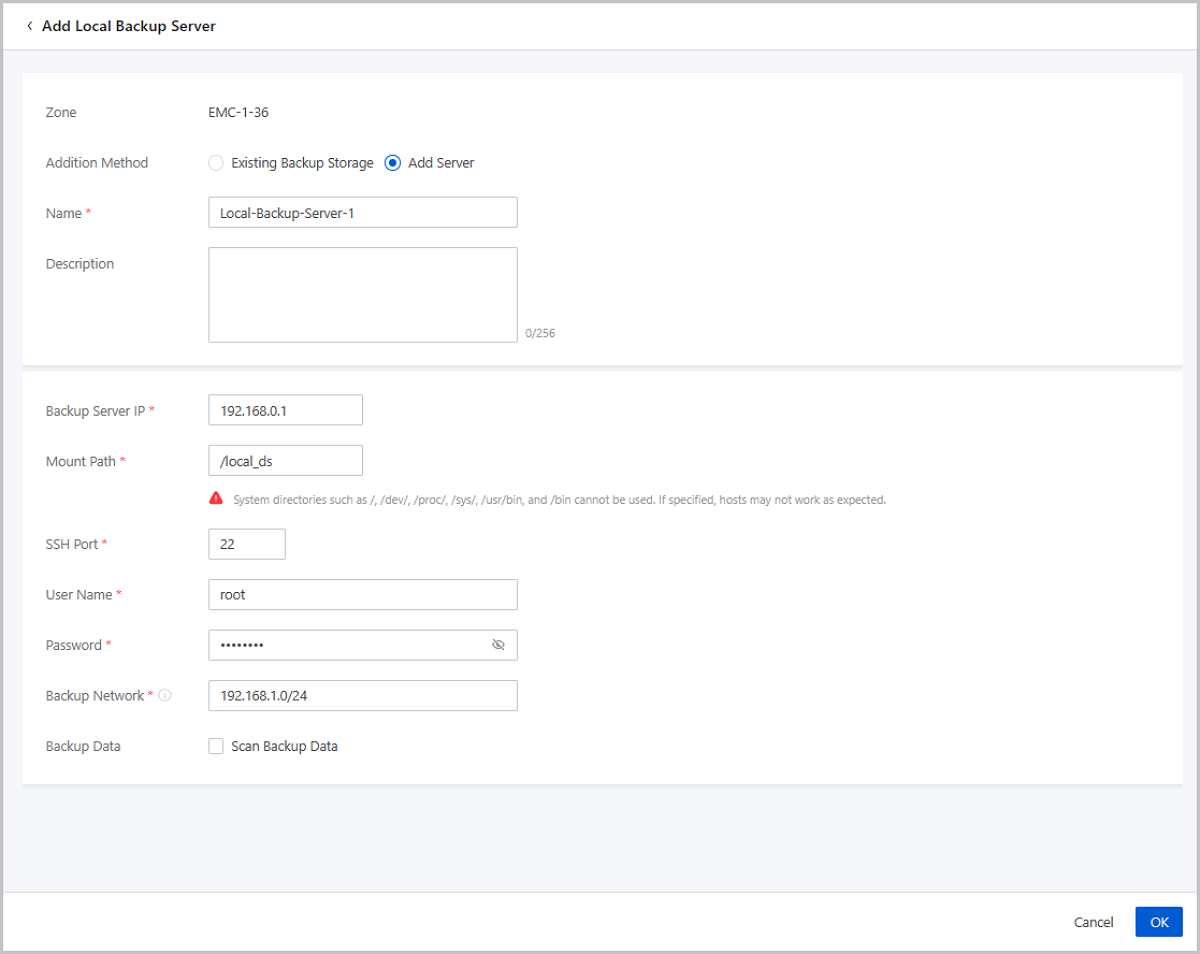
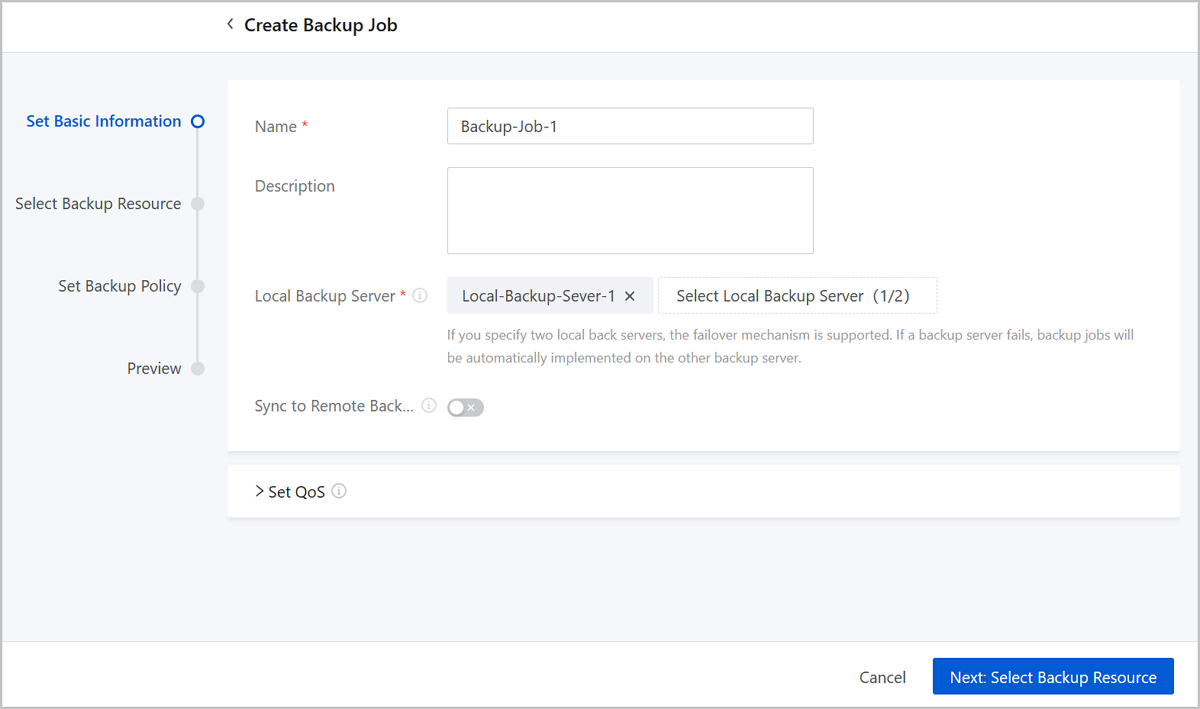
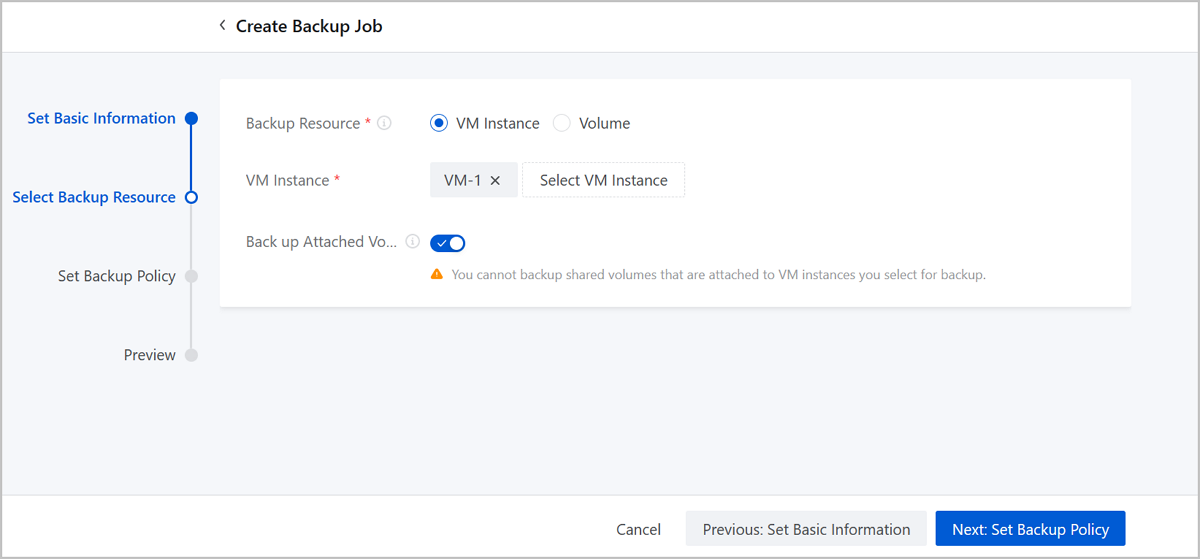
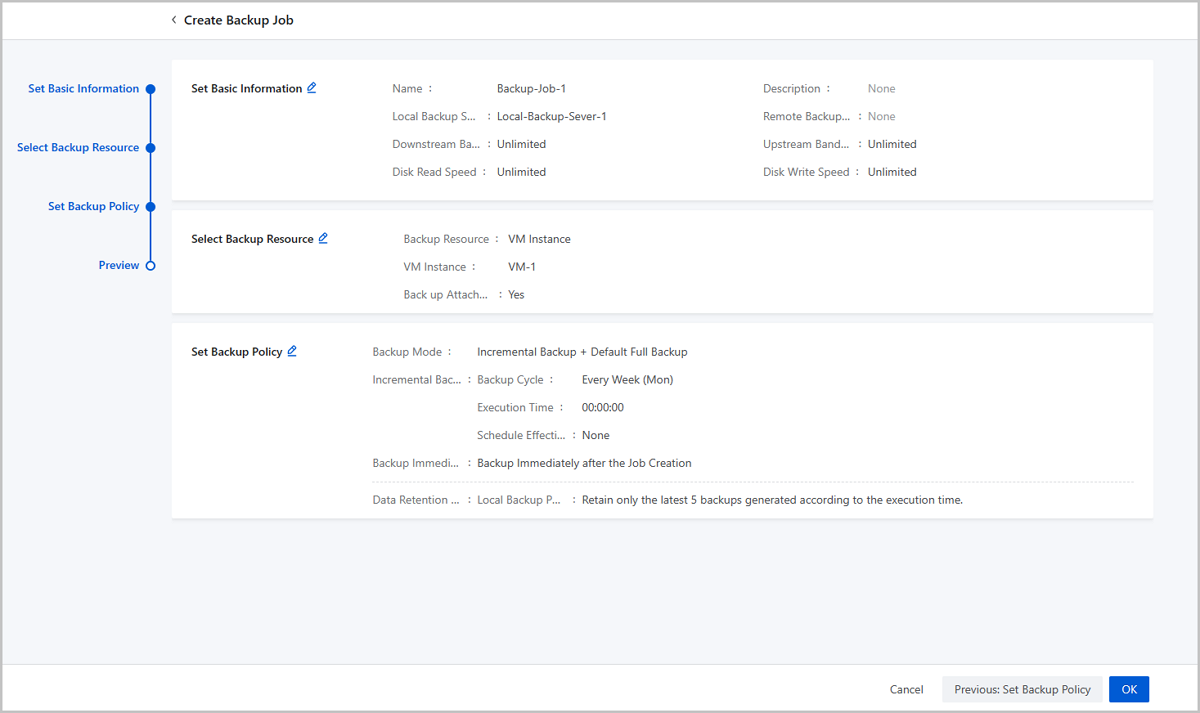
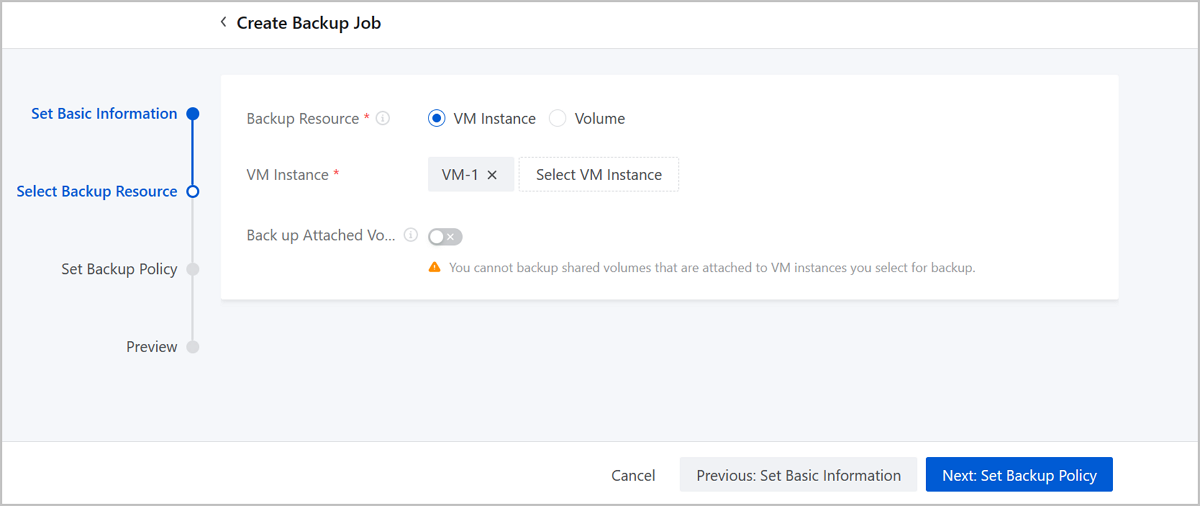
On the main menu of ZStack Cloud, choose . Then the Backup Job page appears. On the page, choose . Then, the Create Backup Job page is displayed.
To create a backup job, follow these four steps:
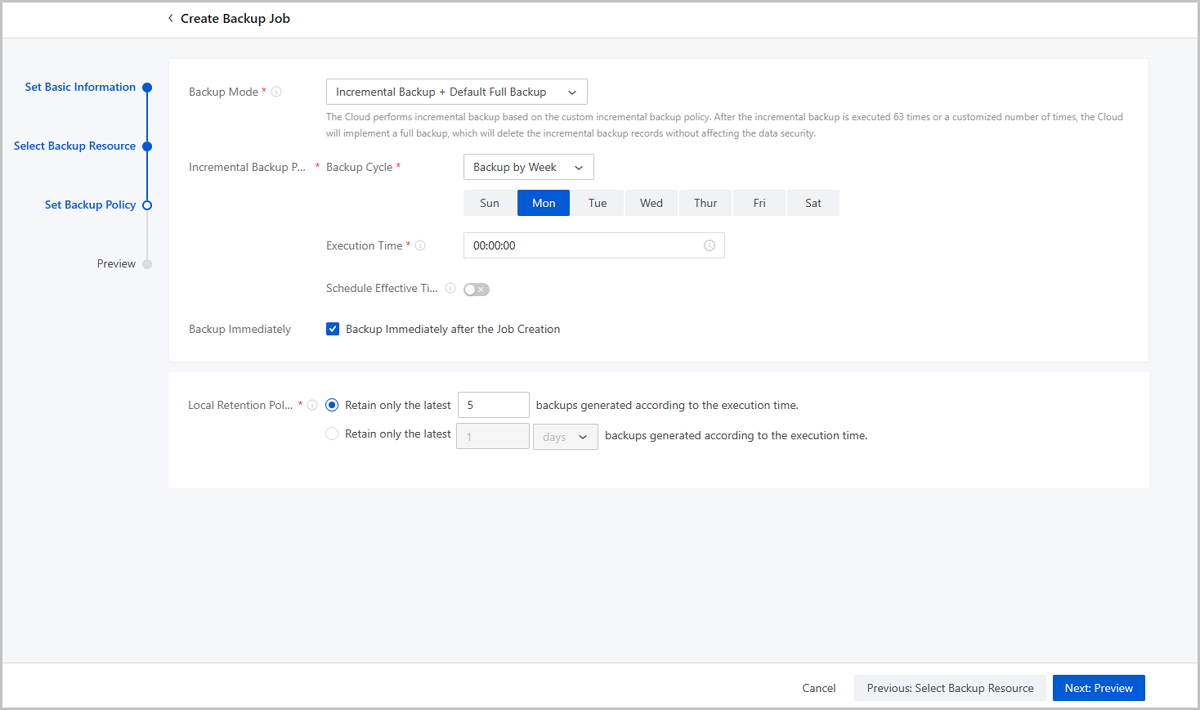
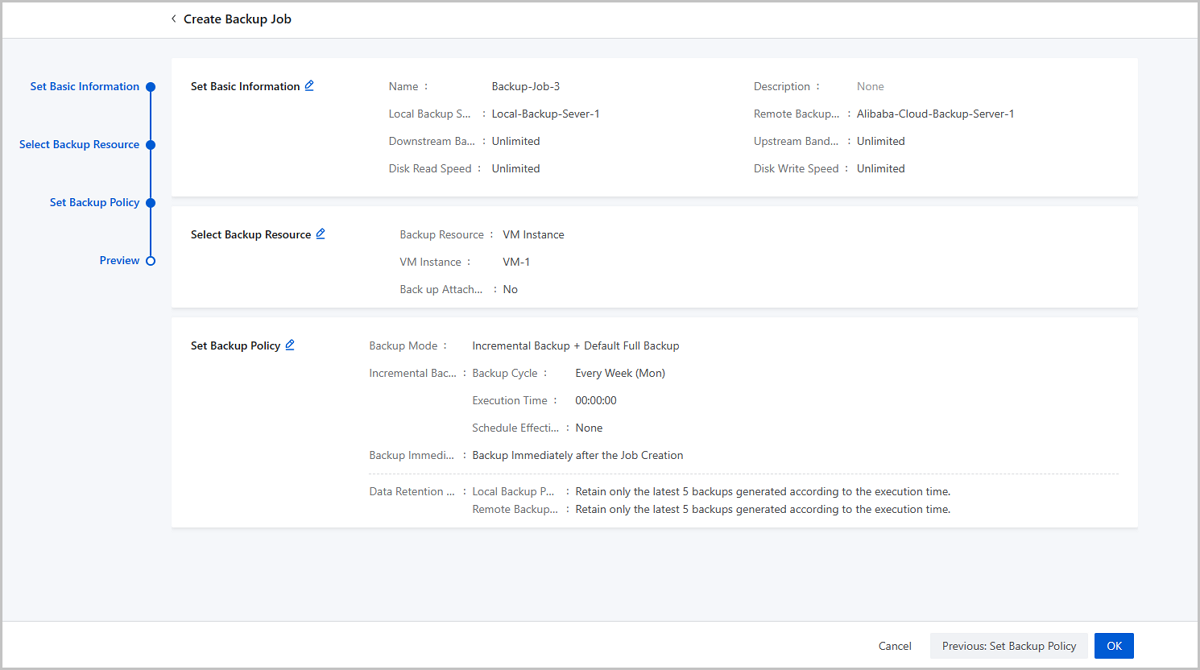
Preview the backup job. You can modify the configuration of the backup job by clicking the Edit icon.
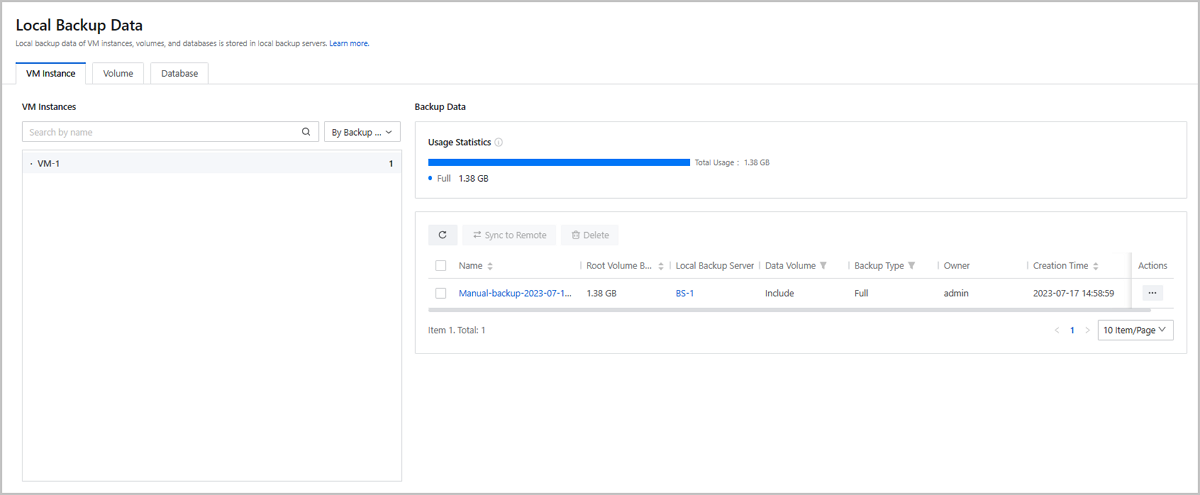
On the main menu of ZStack Cloud, choose . Then, the Local Backup Data page is displayed. You can check the service VM instance backup data.
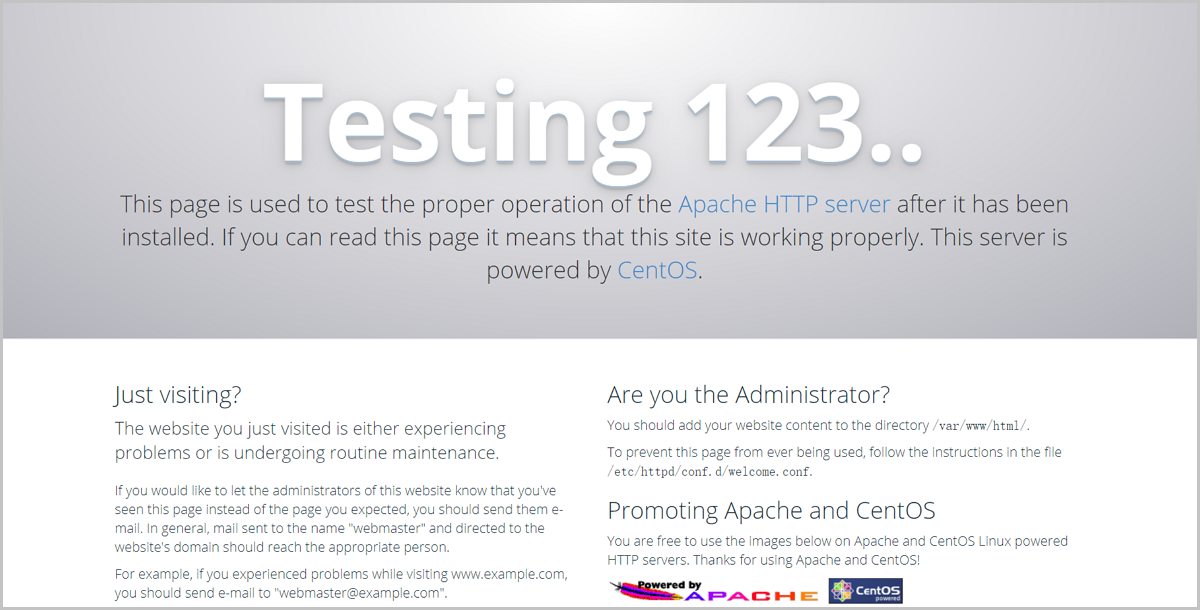
Use a browser to access to the Web service URL and confirm that the VM instance can normally provide Web service and the data is normal.
Assume that you mistakenly expunge the service VM instance causing Web service interruption.

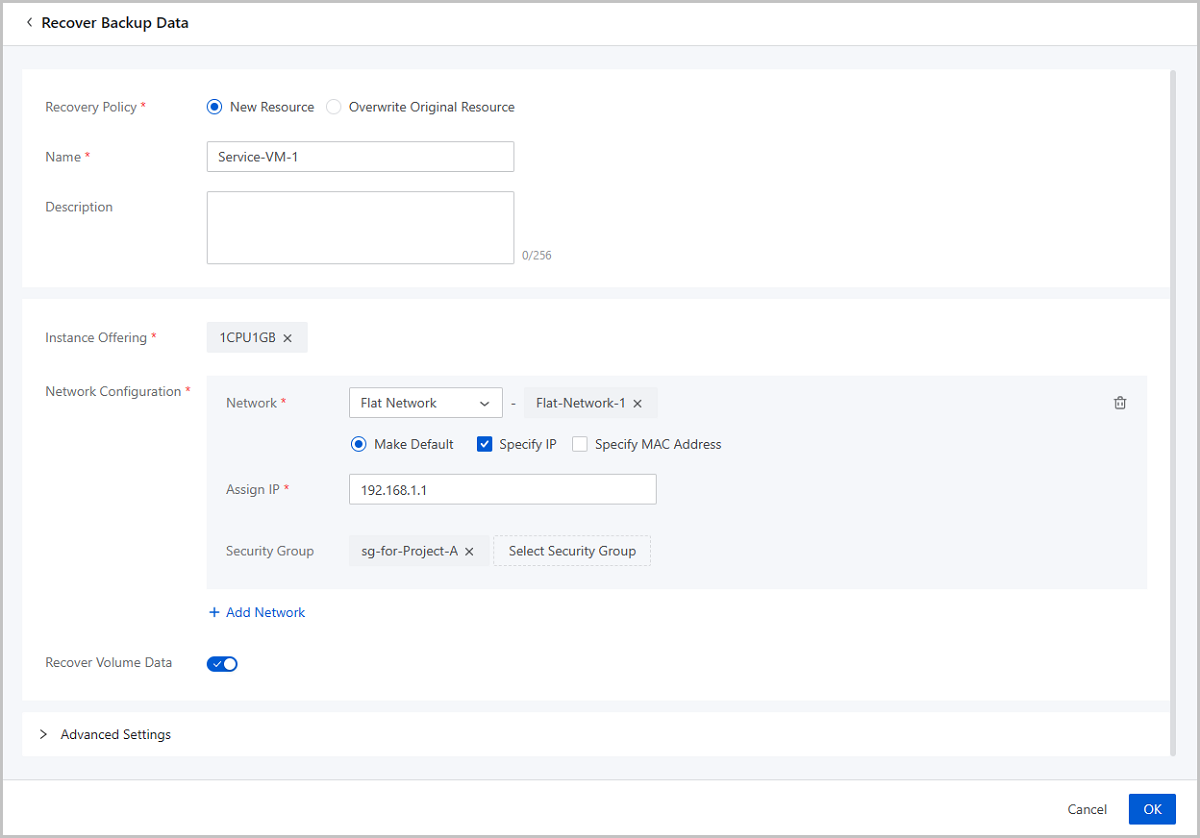
On the main menu of ZStack Cloud, choose . On the Local Backup Data page, locate the backup data of the mistakenly expunged VM instance and click . Then, the Recover Backup Data page is displayed.
Use a browser to access to the Web service URL and confirm that the VM instance can normally provide Web service and the data is normal.
So far, we have introduced the typical practice of the local backup scenario.
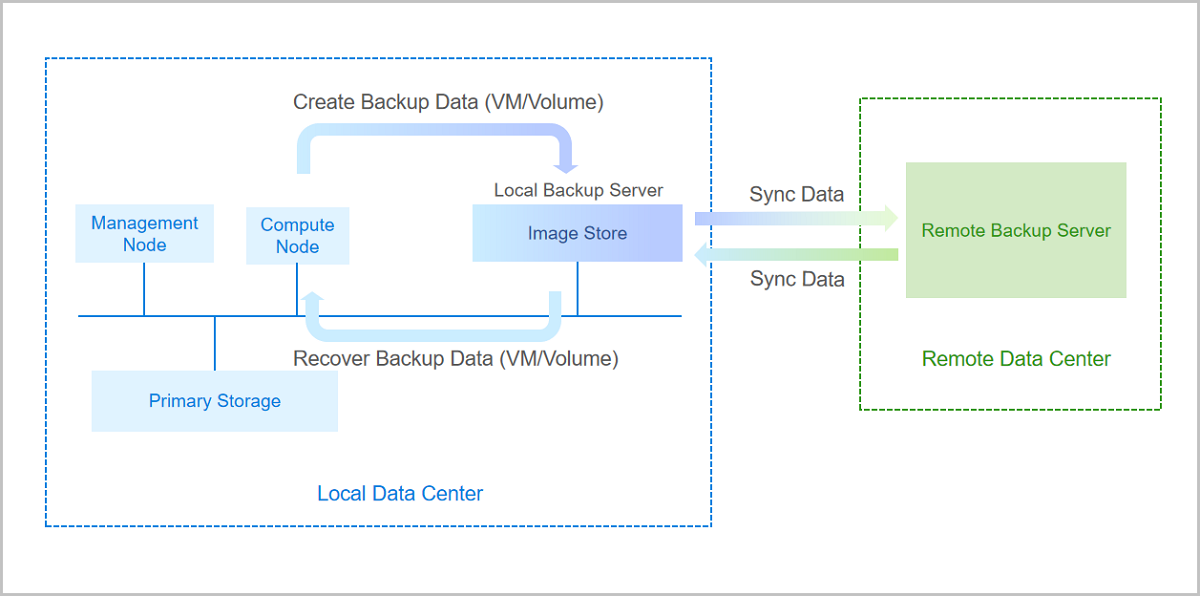
Assume that you have deployed the latest ZStack Cloud environment on local and purchased both the Base License and the Plus License of Backup Service. Now, you plan to add a local backup server and a remote backup server to backup a service VM instance with non-shared volumes. The data is backed up to the local backup server and synced to the remote backup server in Zone-1. Assume that you have mistakenly expunged a service VM instance causing Web service interruption (http://192.168.1.1) and data loss. In addition, the local backup server is destroyed, so you have to recover backup data from the remote backup server. After data is recovered, both the service and data are back to normal.
| Local Backup Server | Configuration |
|---|---|
| Backup Server IP | 192.168.0.1 |
| Mount Path | /local_ds |
| SSH Port | 22 |
| User Name | root |
| Password | password |
| Backup Network | 192.168.0.0/24 |
| Remote Backup Server | Configuration |
|---|---|
| Backup Server IP | 172.20.0.1 |
| Mount Path | /remote_ds |
| SSH Port | 22 |
| User Name | root |
| Password | password |
On the main menu of ZStack Cloud, choose . On the Local Backup Sever page, click Add Local Backup Sever. Then, the Add Local Backup Sever page is displayed.
Note: Make sure that the backup server uses an operating system consistent with that of the management node.On the main menu of ZStack Cloud, choose . On the Remote Backup Sever page, click Add Remote Backup Sever. Then, the Add Remote Backup Sever page is displayed.
Note: Make sure that the backup server uses an operating system consistent with that of the management node of ZStack Cloud.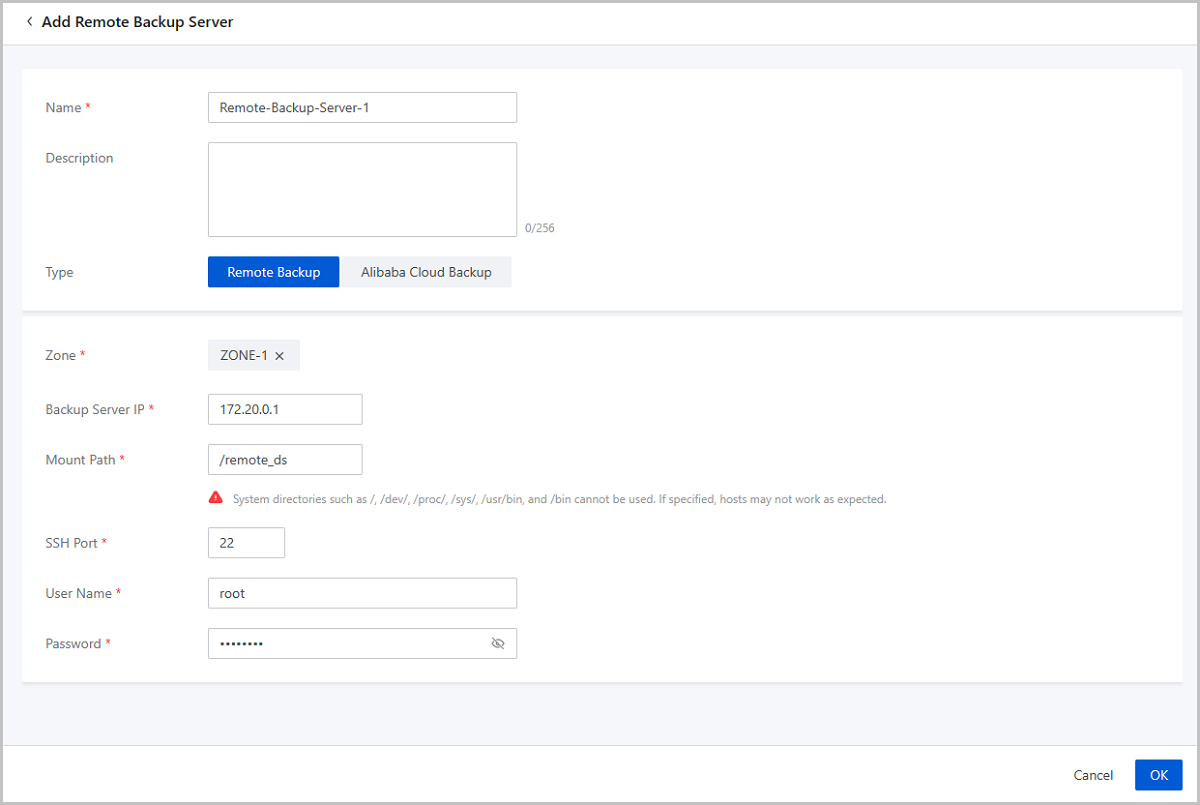
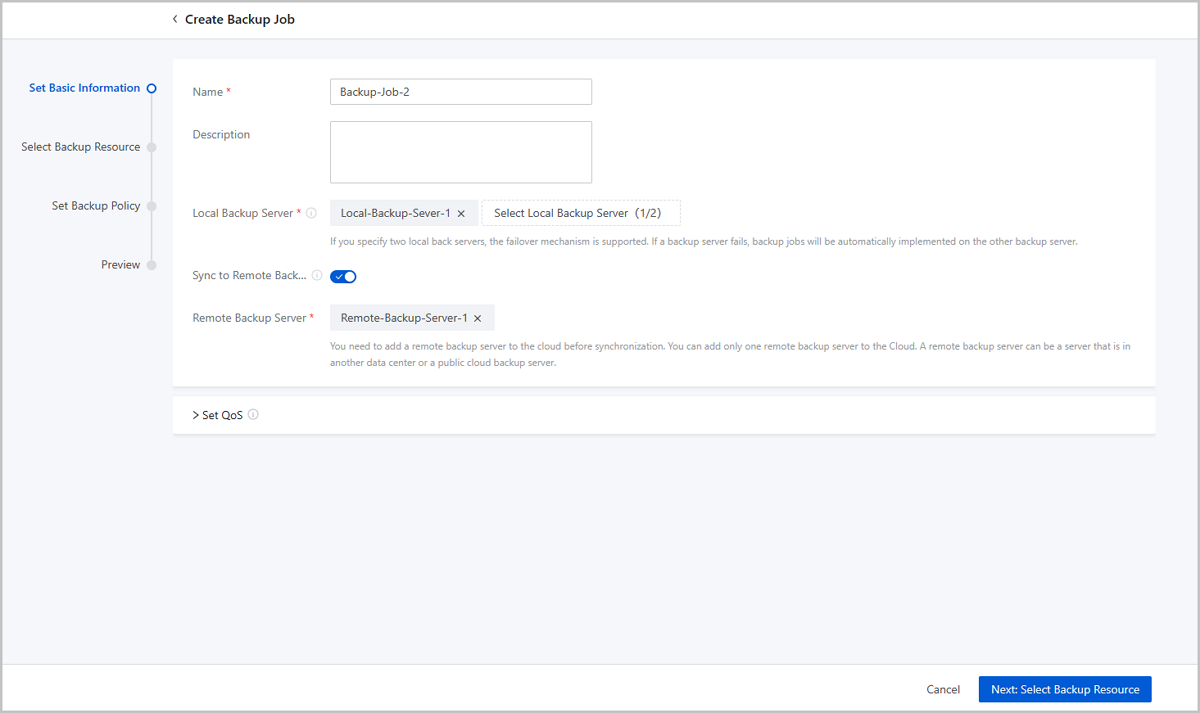
On the main menu of ZStack Cloud, choose . Then the Backup Job page appears. On the page, choose . Then, the Create Backup Job page is displayed.
To create a backup job, follow these four steps:
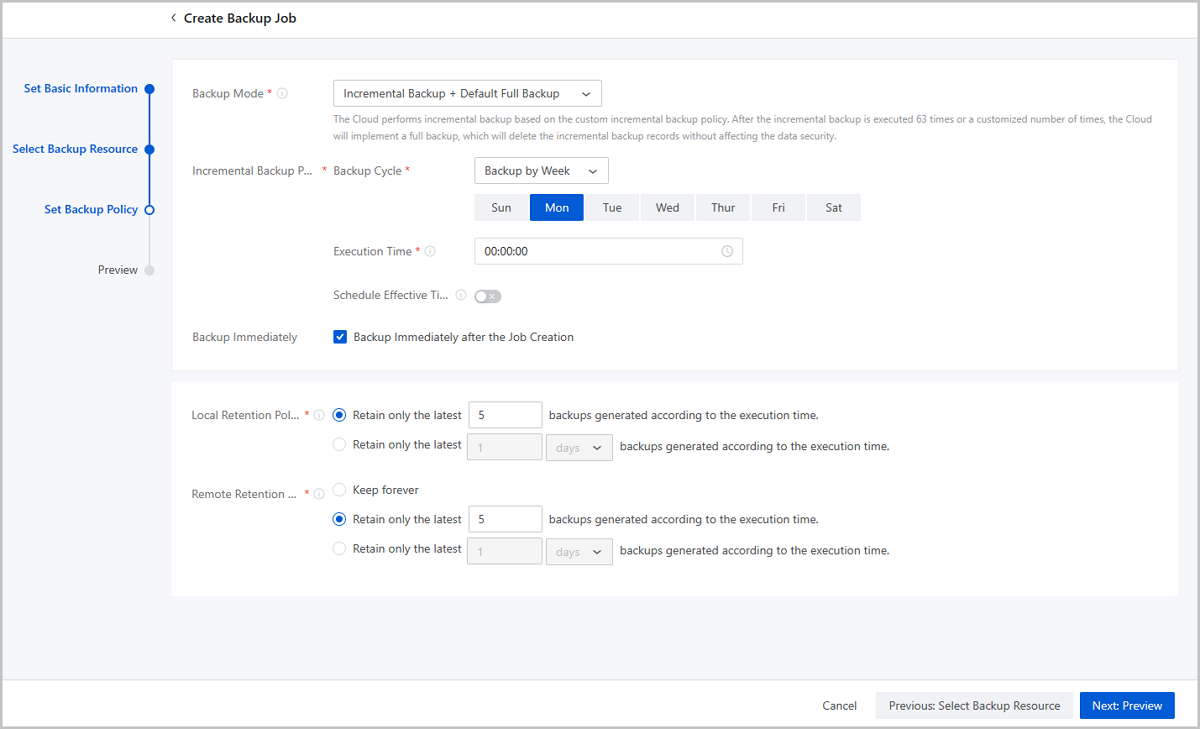
Preview the backup job. You can modify the configuration of the backup job by clicking the Edit icon.

On the main menu of ZStack Cloud, choose . Then, the Local Backup Data page is displayed. You can check the service VM instance backup data.
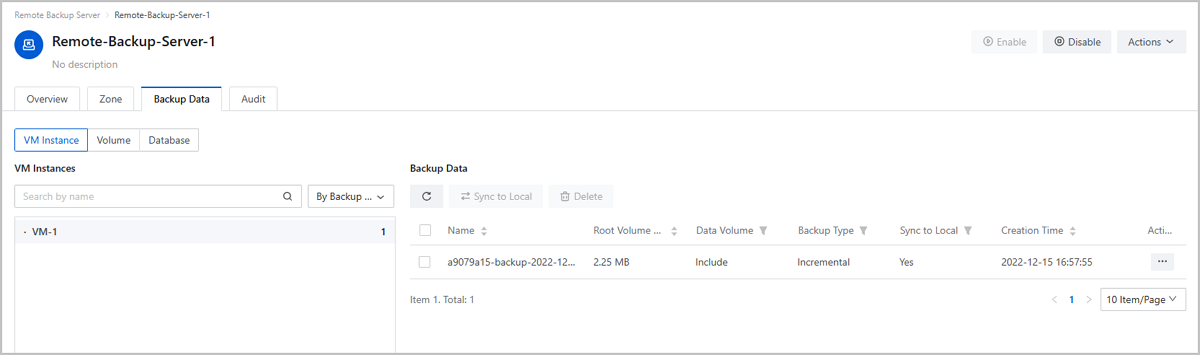
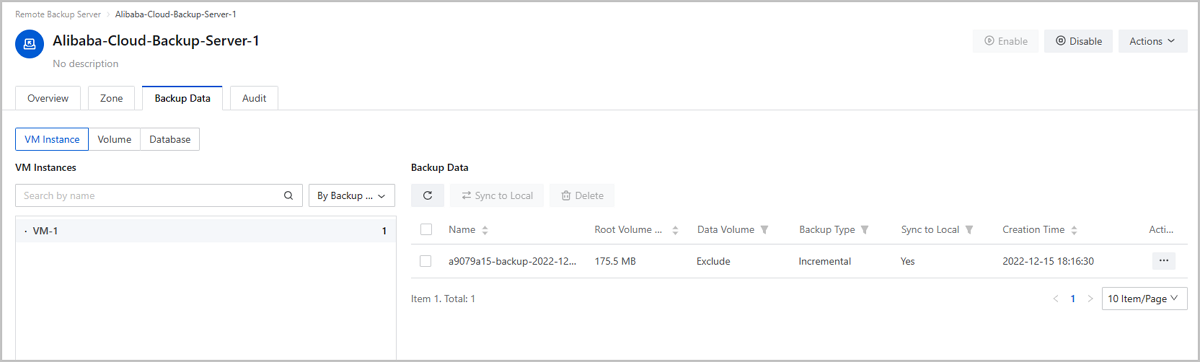
On the main menu of ZStack Cloud, choose . On the Remote Backup Server page, click the name of the remote backup server and enter its details page. On the details page, click Backup Data. Then, the Backup Data tab is displayed. You can check the service VM instance backup data.
Use a browser to access to the Web service URL and confirm that the VM instance can normally provide Web service and the data is normal.
Assume that you mistakenly expunge the service VM instance causing Web service interruption.
On the main menu of ZStack Cloud, choose . On the Remote Backup Server page, click the name of the remote backup server and enter its details page. On the details page, click Backup Data. Then, the Backup Data tab is displayed. On the displayed tab, locate the backup data and click . On the Select Local Backup Server drawer, select a local backup server.

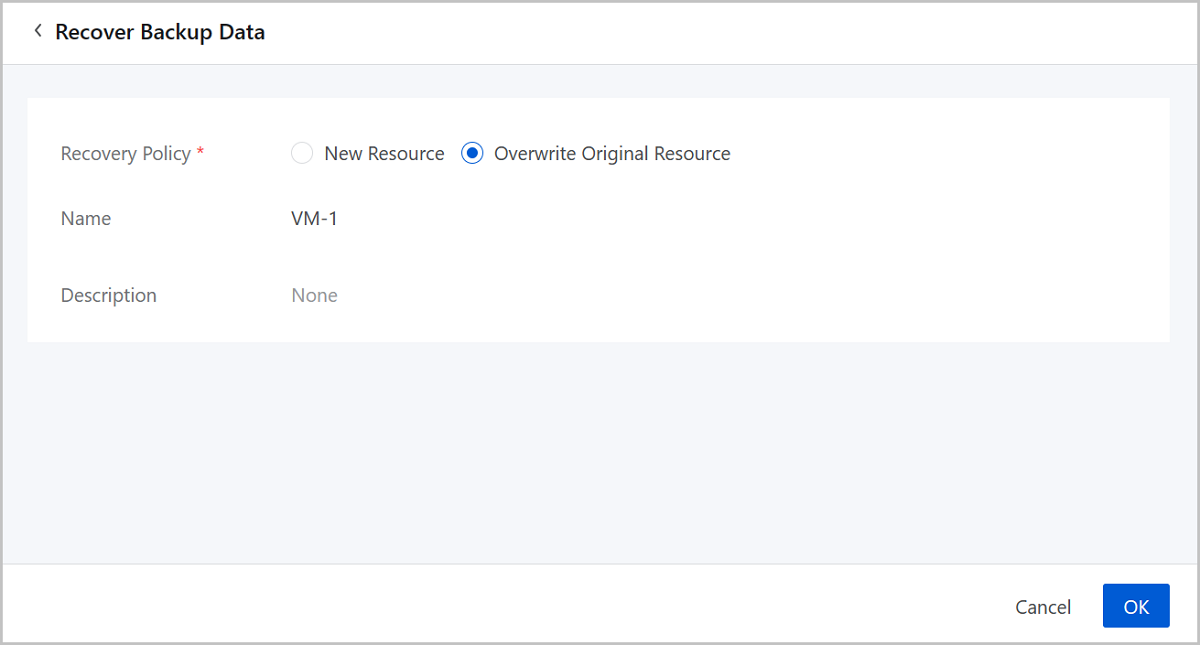
On the main menu of ZStack Cloud, choose . On the Local Backup Data page, locate the backup data of the mistakenly expunged VM instance and click . Then, the Recover Backup Data page is displayed.
Use a browser to access to the Web service URL and confirm that the VM instance can normally provide Web service and the data is normal.
So far, we have introduced the typical practice of the remote backup scenario.
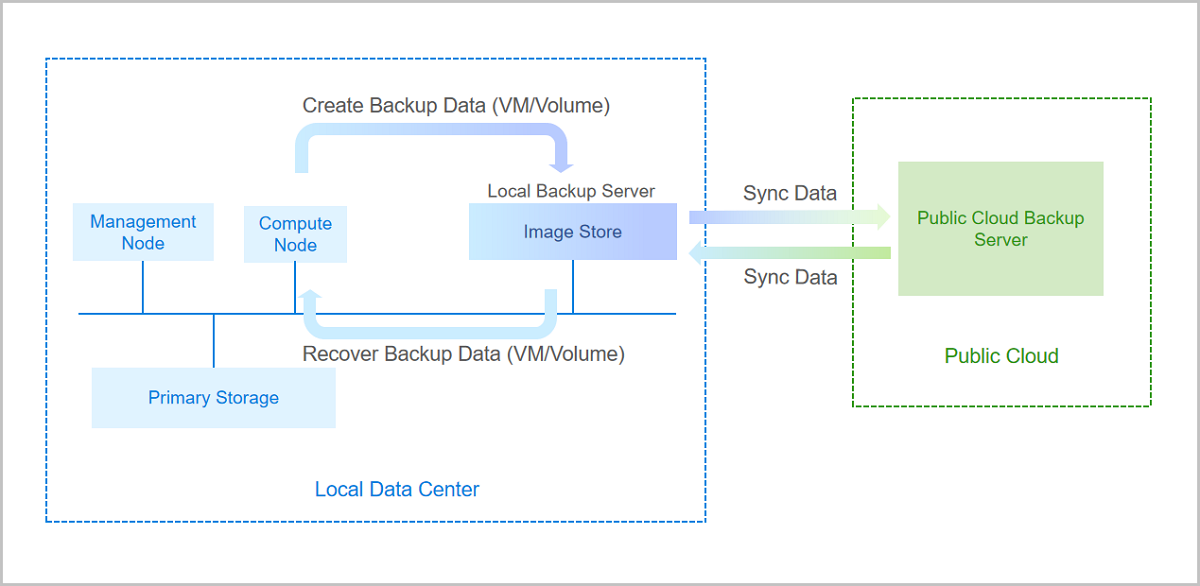
Assume that you have deployed the latest ZStack Cloud environment on local, purchased both the Base License and the Plus License of Backup Service, and owned an ECS instance on Alibaba Cloud. Now, you plan to add a local backup server and an ECS instance as the Public Cloud backup server. The data is backed up to the local backup server and synced to the Public Cloud backup server in Zone-1. Assume that the VM instance data is mistakenly changed causing Web service data error (http://192.168.1.1). In addition, the local backup server is destroyed, so you have to recover data from the Public Cloud backup server. After data is recovered, both the service and data are back to normal.
| Local Backup Server | Configuration |
|---|---|
| Backup Server IP | 192.168.0.1 |
| Mount Path | /local_ds |
| SSH Port | 22 |
| User Name | root |
| Password | password |
| Backup Network | 192.168.0.0/24 |
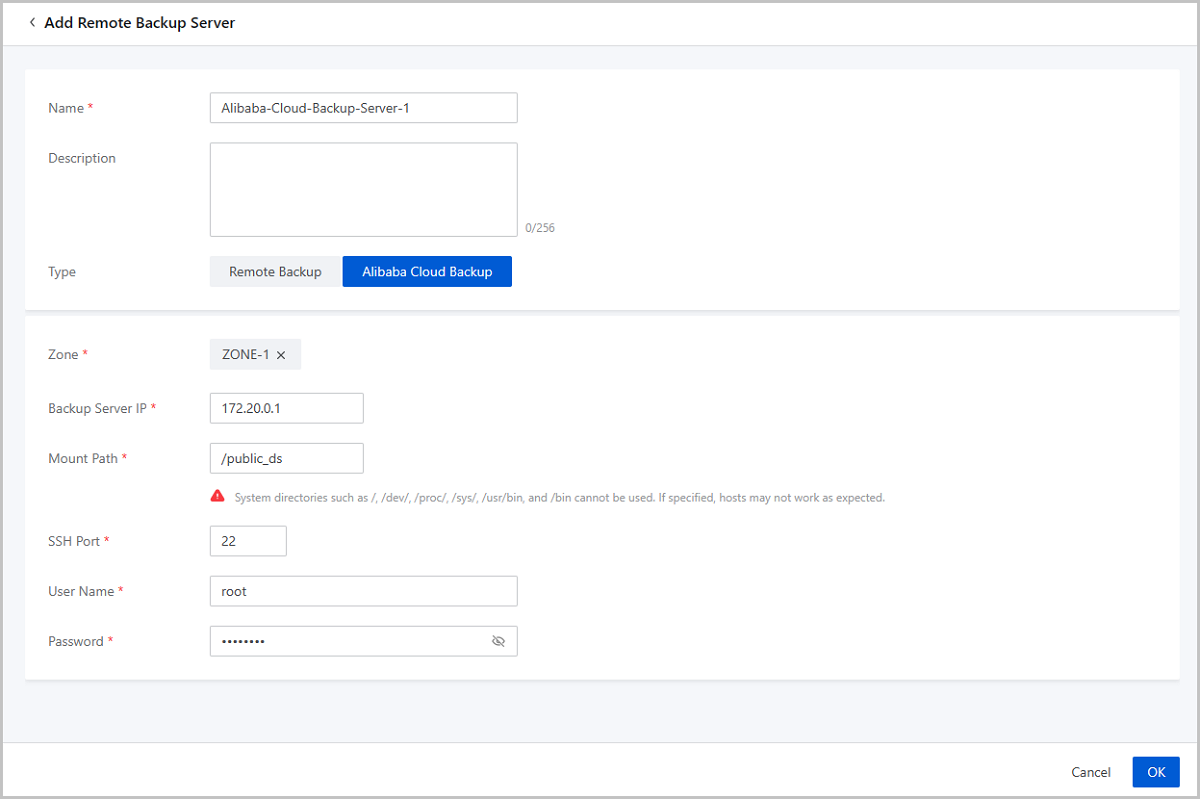
| Public Cloud Backup Server | Configuration |
|---|---|
| Backup Server IP | 172.20.0.1 |
| Mount Path | /public_ds |
| SSH Port | 22 |
| User Name | root |
| Password | password |
On the main menu of ZStack Cloud, choose . On the Local Backup Sever page, click Add Local Backup Sever. Then, the Add Local Backup Sever page is displayed.
Note: Make sure that the backup server uses an operating system consistent with that of the management node.On the main menu of ZStack Cloud, choose . On the Remote Backup Sever page, click Add Remote Backup Sever. Then, the Add Remote Backup Sever page is displayed.
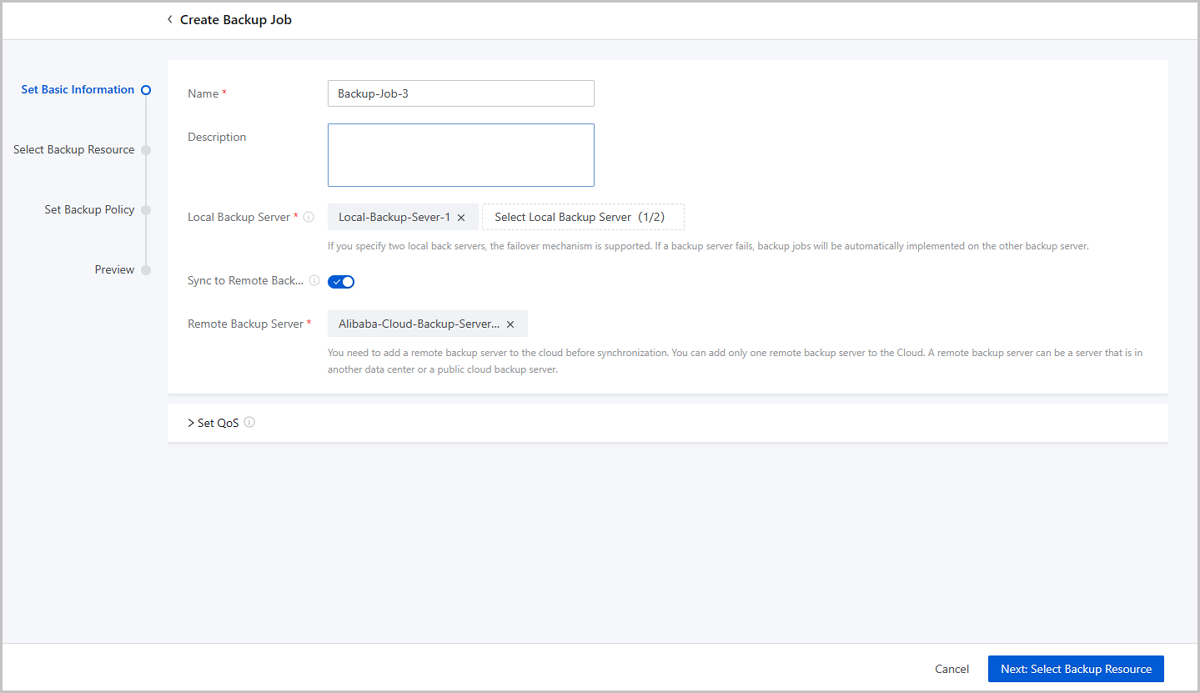
On the main menu of ZStack Cloud, choose . Then the Backup Job page appears. On the page, choose . Then, the Create Backup Job page is displayed.
To create a backup job, follow these four steps:
Preview the backup job. You can modify the configuration of the backup job by clicking the Edit icon.
On the main menu of ZStack Cloud, choose . Then, the Local Backup Data page is displayed. You can check the service VM instance backup data.

On the main menu of ZStack Cloud, choose . On the Remote Backup Server page, click the name of the Alibaba Cloud backup server and enter its details page. On the details page, click Backup Data. Then, the Backup Data tab is displayed. You can check the service VM instance backup data.
Use a browser to access to the Web service URL and confirm that the VM instance can normally provide Web service and the data is normal.
Assume that you have changed the Web data of the service VM instance by mistake and delete the backup data in local backup server, which resulting in abnormal Web display.

On the main menu of ZStack Cloud, choose . On the Local Backup Data page, locate the backup data of the service VM instance and click . Then, the Recover Backup Data page is displayed.
Use a browser to access to the Web service URL and confirm that the VM instance can normally provide Web service and the data is normal.
So far, we have introduced the typical practice of the Public Cloud backup scenario.


