Typical Scenarios

About this task

To use the GPU virtualization feature:
  1. Install GPU drivers and vGPU drivers on the host.
  2. Enable IOMMU in the host BIOS.
  3. Check pGPUs or pGPU specifications.
  4. Virtualize pGPUs.
  5. Check vGPUs or vGPU specifications.
  6. Attach vGPUs to the VM instance.
  7. Install vGPU drivers on the VM instance.

Before using the GPU virtualization feature, ensure that requirements in Preparations have been met completely and correctly. Below is detailed operational procedures for performing the virtualization:

Procedure

  1. Install GPU drivers and vGPU drivers on the host.
    After attaching a GPU device to the host, you need to install the corresponding driver to use it properly.
    • NVIDIA: Both the GPU driver and the vGPU driver need to be installed. You can refer to the table Recommended GPU Driver and Click Here to download the appropriate official driver.
    • AMD: The GPU driver need to be installed, while the vGPU driver is automatically generated by ZStack Cloud. You can refer to the table Recommended GPU Driver and Click Here to download the appropriate official driver.
    • Huawei: The GPU driver specified in the table Recommended GPU Driver need to be installed. GPU monitoring and virtualizing both depend on this driver. Contact Huawei's official support to obtain it.
    The procedures of installing the GPU driver vary depending on the version of your GPU device. For more information, you can contact GPU suppliers for assistance. This tutorial takes the installation of NVIDIA GPU driver on a host as an example. You can refer to the operational procedures below:
    1. Obtain the required GPU driver installation package.
    2. Install the kernel-devel package matching the kernel version, along with gcc, make, and other required packages.
    3. Run the rpm -i ${GPUDRIVERPACKETNAME} command to install the driver on the host.
    4. Reboot the host and run the nvidia-smi command to check the GPU information. If the host successfully detects the GPU device, the GPU driver has been successfully installed on the host.
  2. Enable IOMMU in the host BIOS.
    Make sure that Intel VT-d or AMD IOMMU is enabled in the host BIOS before you enable the IOMMU option on ZStack Cloud.
    • For adding host: Choose Resource Center > Hardware > Computing Facility > Host > Add Host, set Scan Host IOMMU Setting to true to enable IOMMU.
      Figure 1. Add Host and Enable IOMMU


    • For added host: Select one added host and set IOMMU State to true on its details page. Reboot the host and the IOMMU setting will take effect.
      Figure 2. Enable IOMMU for Added host


    Note: After enabling the IOMMU setting on the host, you also need to ensure that IOMMU Status on the same page is available. Otherwise, the GPU virtualization feature cannot work as expected. If IOMMU State is enabled, yet the IOMMU Status is unavailable, the reason could be as follows:
    • The IOMMU setting is enabled but the host is not rebooted. Just reboot the host.
    • If a host configuration error occurs, please enter the host BIOS and enable Intel VT-d or AMD IOMMU.
  3. Check pGPUs or pGPU Specifications.
    When the IOMMU state is enabled, and the IOMMU status is available, ZStack Cloud can detect the pGPU and its specifications on the host.
    • Check pGPUs: On the host details page, select one added host and chooseAssociated Resource > PCI Device > Physical GPU to check the pGPU devices detected on this host.
    • Check pGPU specifications:

      On the main menu of ZStack Cloud, choose Resource Center > Resource Pool > Compute Configuration > GPU Specification. On the GPU Specification page, check the scanned pGPU specifications.

  4. Virtualize pGPUs.
    Virtualizing pGPUs means dividing the pGPUs unallocated for passthrough into multiple specified vGPUs. Methods for pGPU virtualization vary slightly depending on GPU manufacturers. Currently, ZStack Cloud supports the virtualization of NVIDIA pGPUs and AMD pGPUs.
    • Virtualize NVIDIA pGPUs: Supports virtualizing NVIDIA pGPUs according to the selected specifications.

      On the host details page, select one added host and choose Associated Resource > PCI Device > Physical GPU. You have to select a virtualizable pGPU and click Action > Virtualization. The same is true of virtualizing AMD pGPUs.

      The virtualization specification lists all the specifications this pGPU can be virtualized into. For example: GRID M60-2A(4ins-2048 MiB-1280*1024) implies that a core pGPU is virtualized into 4 vGPUs with a frame rate of 60FPS, graphics memory of 2048MB, and a resolution of 1280*1024.
      Note: If you need to restore the vGPU to a pGPU, click Action > Ungenerate. To restore the NVIDIA vGPU, ensure that all the vGPUs related to this pGPU have been detached from the VM instance.
    • Virtualize AMD pGPUs: Not only supports virtualizing AMD pGPUs according to the selected number, but also supports virtualizing all the AMD pGPUs on the host at the same time.

      Note: If you need to restore the vGPU to a pGPU, click Action > Ungenerate. Before restoring the AMD vGPU, ensure that all AMD vGPUs related to the current AMD graphics card have been detached from the VM instance.
  5. Check vGPUs or vGPU specifications.
    Once the virtualization is completed, vGPUs and vGPU specifications will present themselves. You can check them on the corresponding page.
    • Check vGPUs:

      On the host details page, select one added host and choose Associated Resource > PCI Device > vGPU to check the vGPU devices on the host.

    • Check vGPU specifications:

      On the main menu of ZStack Cloud, choose Resource Center > Resource Pool > Compute Configuration > GPU Specification > vGPU Specification to check the vGPU specifications.

  6. Attach vGPUs to the VM instance.
    On ZStack Cloud, you can use the following methods to attach vGPUs to the VM instance:
    • Method 1: Create a VM instance and attach vGPUs to It
      To create a VM instance, you need to choose Resource Center > Resource Pool > Virtual Resource > VM Instance > Create VM Instance. After you complete Basic Configuration, you come to next stage, that is, Resource Configurations. We support two GPU attachment policies including attaching GPU specification and attaching GPU device. Set the following parameters as you need:
      • Attach GPU Specification: Select a vGPU specification and the system allocates vGPU device(s) to the VM instance according to this specification. You can choose whether to make these vGPU device(s) automatically detached when the VM is stopped. If you set Auto Detach to true, these vGPU device(s) would be automatically detached when the VM is stopped. When the VM restarts, the system re-allocates vGPU device(s) to it according to the GPU specification. If you set Auto Detach to false, the VM would keep these vGPU devices attached and continue using them when it restarts.
        Note: if the VM is stopped unexpectedly when Auto Detach is set to false, it cannot automatically start even though its HA mode is NeverStop.
      • Attach GPU Device: Select a vGPU device and attach it directly to the VM instance.
      After completing the configurations, click OK. Then you'll get a VM instance with vGPUs attached.
    • Method 2: Attach vGPUs to an Existing VM Instance

      On the main menu of ZStack Cloud, choose Resource Pool > VM Instance. On the VM Instance page, click the name of an existing VM instance to enter its details page. Choose Configuration info on the top row. Find vGPU Device on this page and click Attach.

      • One VM instance can attach only one vGPU at a time and does not support attaching both pGPUs and vGPUs at the same time.
      • If you want to detach a GPU device, select it and click Actions > Detach.
      • To attach or detach vGPUs, ensure that the VM instance is in the Stopped state.
    • Method 3: Attach vGPUs to Existing VM Instances

      Select one or more stopped VM instances in the management interface of VM Instance, and click Bulk Action > System Configurations > Set GPU Policy. Then you have two options to choose, that is, attach GPU specification or attach GPU device.

  7. Install vGPU drivers on the VM instance
    After attaching a GPU device to the VM instance, you need to install corresponding GPU drivers. The procedures of installing the vGPU driver vary depending on the version of your vGPU. For more information, you can contact GPU suppliers for assistance. This chapter takes installing a NVIDA GPU on the Linux VM instance as an example. You can refer to the operational procedures below:
    1. Obtain the related driver installation files:

      Obtain the driver and CUDA toolkit compatible with the GPU device.

    2. Disable the Nouveau driver:
      If NVIDIA drivers conflict with the Nouveau kernel driver, you can run the command lsmod | grep nouveau to check whether the Nouveau driver has been installed. If the output data suggests the Nouveau driver has been installed, you can perform the following operations to disable it. If no output is displayed, just skip this procedure.
      # touch  /etc/modprobe.d/nvidia-installer-disable-nouveau.conf  # Create a file and save the two lines below into it  blacklist nouveau  options nouveau modeset=0
    3. Install the gcc, kernel-devel, and kernel-headers files:
      Run the following commands to install the gcc, kernel-devel, and kernel-headers files and ensure that these kernel source files are of the same version. We recommend using the same version of ISO to configure local installations.
      # yum install gcc kernel-devel-$(uname -r)  kernel-headers-$(uname -r)     # Reconstruct initramfs image # cp /boot/initramfs-$(uname -r).img /boot/initramfs-$(uname -r).img.bak # dracut /boot/initramfs-$(uname -r).img $(uname -r) --force       # Only reboot the VM in the text mode # systemctl set-default multi-user.target  # init 3  # reboot   # lsmod | grep nouveau    # After the VM instance is rebooted, check whether the nouveau driver is used or not
    4. Install an NVIDIA Driver:
      Upload the downloaded package to the VM instance and run the following commands to install the driver.
      # chmod +x NVIDIA-Linux-x86_64-346.47.run    # Configure executable permissions # ./NVIDIA-Linux-x86_64-346.47.run      # Execute the driver script
      After you run the commands, the driver package will begin to unpack and you can follow the installation instructions. During the installation, some warnings may appear. Confirm these warnings in sequence as they do not have any real impact. If some errors occur, please refer to the table below to check the environment.
      Table 1. Error Resolution
      Error Message Solution

      ERROR: Unable to find the kernel source tree for the currently running kernel. Please make sure you have installed the kernel source files for your kernel and that they are properly configured; on Red Hat Linux systems, for example, be sure you have the 'kernel-source' or 'kernel-devel' RPM installed. If you know the correct kernel source files are installed, you may specify the kernel source path with the '--kernel-source-path' command line option.

      You need to have all of the kernel source files (including kernel, kernel-headers, and kernel-devel) installed and ensure that they are of the same version

      ERROR: The Nouveau kernel driver is currently in use by your system. This driver is incompatible with the NVIDIA driver, and must be disabled before proceeding. Please consult the ow to correctly disable the Nouveau kernel driver.

      You have to disable the Nouveau kernel driver

      ERROR: Failed to find dkms on the system!

      ERROR: Failed to install the kernel module through DKMS. No kernel module was installed; please try installing again without DKMS, or check the DKMS logs for more information.

      You need to install DKMS, which helps maintain out-of-tree drivers by automatically regenerating new modules when the kernel version changes

      ERROR: Unable to load the kernel module 'nvidia.ko'. This happens most frequently when this kernel module was built against the wrong or improperly configured kernel sources, with a version of gcc that differs from the one used to build the target kernel, or if a driver such as rivafb, nvidiafb, or nouveau is present and prevents the NVIDIA kernel module from obtaining ownership of the NVIDIA graphics device(s), or no NVIDIA GPU installed in this system is supported by this NVIDIA Linux graphics driver release.

      Run the commands ./NVIDIA-Linux-x86_64-384.98.run --kernel-source-path=/usr/src/kernels/3.10.0-XXX.x86_64/ -k $(uname -r)
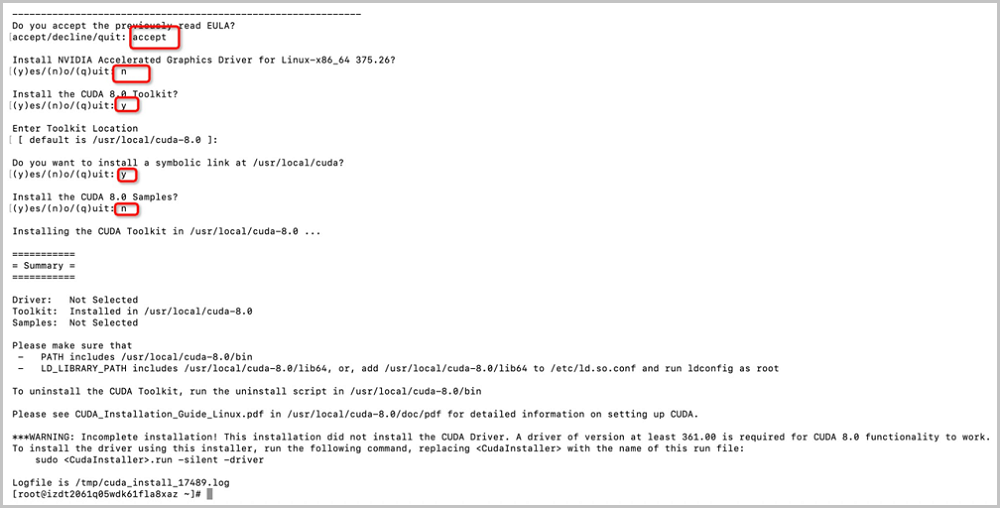
    5. Check whether the installation is successful:
      Respectively run the following two commands to check whether the installation is successful. If GPU information such as model is displayed in the command output, the driver has been installed successfully.
      # lspci |grep NVIDIA # nvidia-smi
    6. Install the CUDA toolkit:
      Download CUDA Toolkit installation package and upload this package to the VM system. Run the following commands to execute the driver script:
      # chmod +x cuda_8.0.61_375.26_linux.run      #Set executable permission # ./cuda_8.0.61_375.26_linux.run     #Run the driver file

      During the installation, please set the following parameters:

      Figure 3. Install CUDA Toolkit


    7. Configure environment variables:
      Run the vim /root/.bashrc command and save the content below to the same file:
      #gpu driver export CUDA_HOME=/usr/local/cuda-8.0   export PATH=/usr/local/cuda-8.0/bin:$PATH   export LD_LIBRARY_PATH=/usr/local/cuda-8.0/lib64:$LD_LIBRARY_PATH   export LD_LIBRARY_PATH="/usr/local/cuda-8.0/lib:${LD_LIBRARY_PATH}"
      Environment variables will take effect once added. To verify the effect, you can run the following commands:
      # source ~/.bashrc # cd /usr/local/cuda-8.0/samples/1_Utilities/deviceQuery # make # ./deviceQuery

Archives

Download Document Archives

Download

Already filled the basic info?Click here.

Enter at least 2 characters.
Invalid mobile number.
Enter at least 4 characters.
Invalid email address.
Wrong code. Try again. Send Code Resend Code (60s)

An email with a verification code will be sent to you. Make sure the address you provided is valid and correct.

同意 不同意

I have read and concur with the Site TermsPrivacy PolicyRules and Conventions on User Management of ZStack Cloud

Download

Not filled the basic info yet? Click here.

Invalid email address or mobile number.
同意 不同意

I have read and concur with the Site TermsPrivacy PolicyRules and Conventions on User Management of ZStack Cloud

Email Us

contact@zstack.io
ZStack Training and Certification
Enter at least 2 characters.
Invalid mobile number.
Enter at least 4 characters.
Invalid email address.
Wrong code. Try again. Send Code Resend Code (60s)

同意 不同意

I have read and concur with the Site TermsPrivacy PolicyRules and Conventions on User Management of ZStack Cloud

Email Us

contact@zstack.io
Request Trial
Enter at least 2 characters.
Invalid mobile number.
Enter at least 4 characters.
Invalid email address.
Wrong code. Try again. Send Code Resend Code (60s)

同意 不同意

I have read and concur with the Site TermsPrivacy PolicyRules and Conventions on User Management of ZStack Cloud

Email Us

contact@zstack.io

The download link is sent to your email address.

If you don't see it, check your spam folder, subscription folder, or AD folder. After receiving the email, click the URL to download the documentation.

The download link is sent to your email address.

If you don't see it, check your spam folder, subscription folder, or AD folder.
Or click on the URL below. (For Internet Explorer, right-click the URL and save it.)

Thank you for using ZStack products and services.

Submit successfully.

We'll connect soon.

Thank you for using ZStack products and services.