Install in Single Management Node


Bonded NIC Deployment

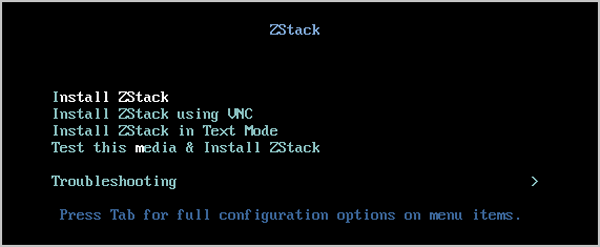
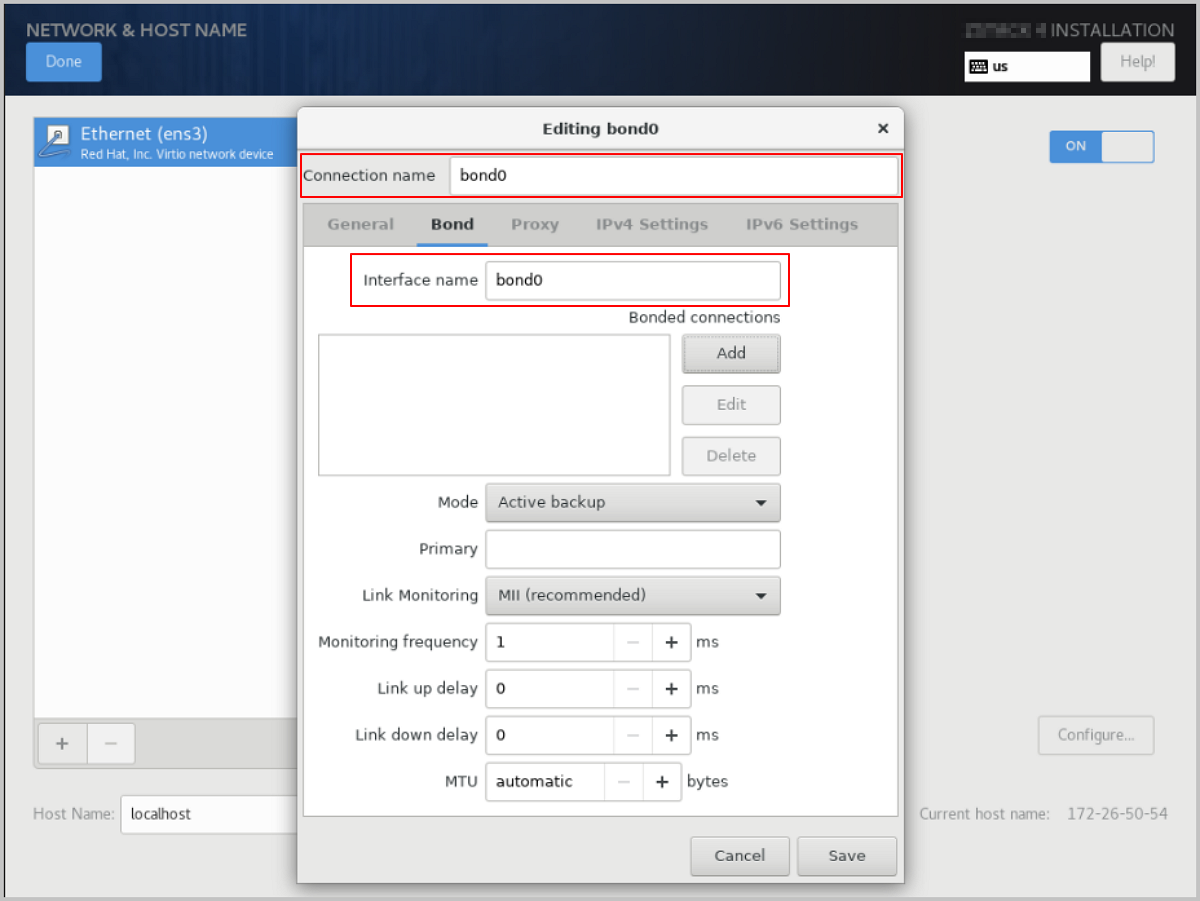
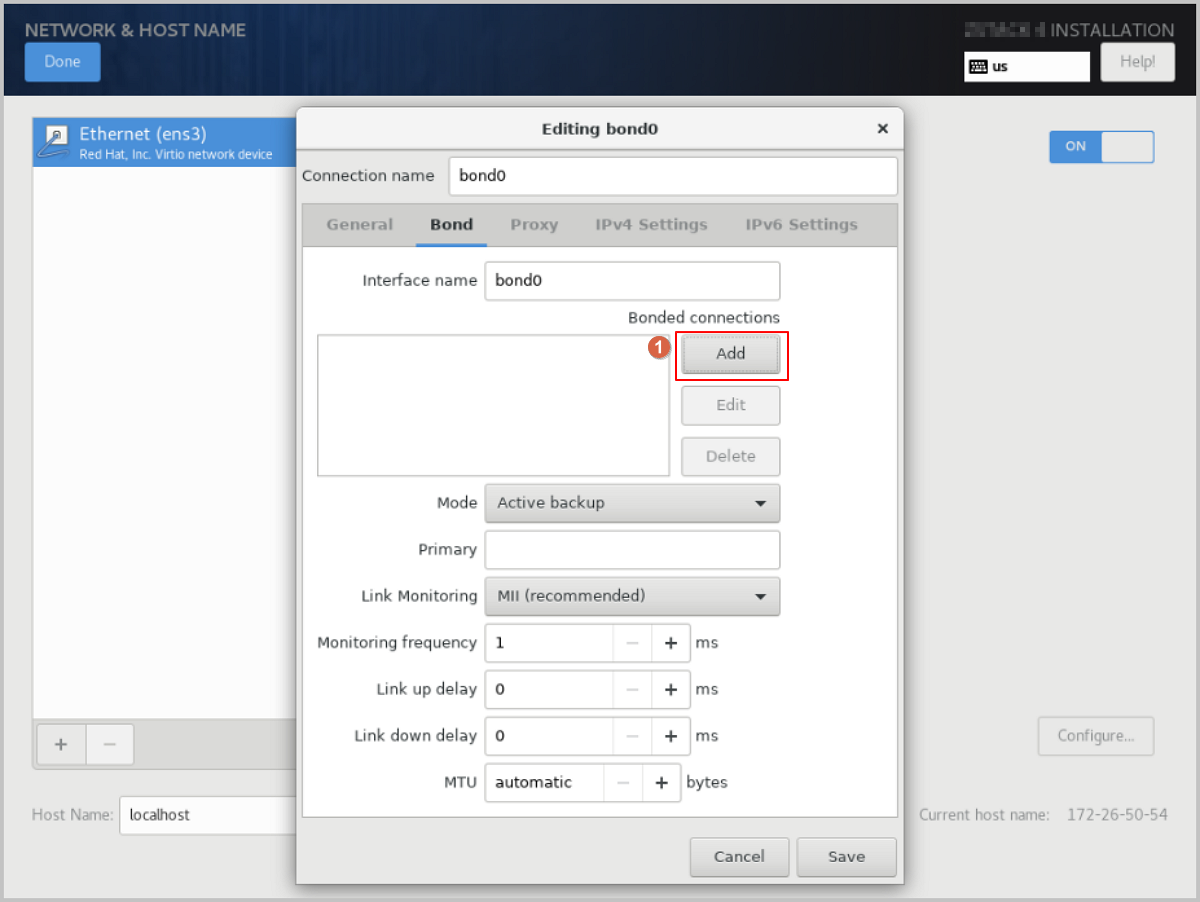
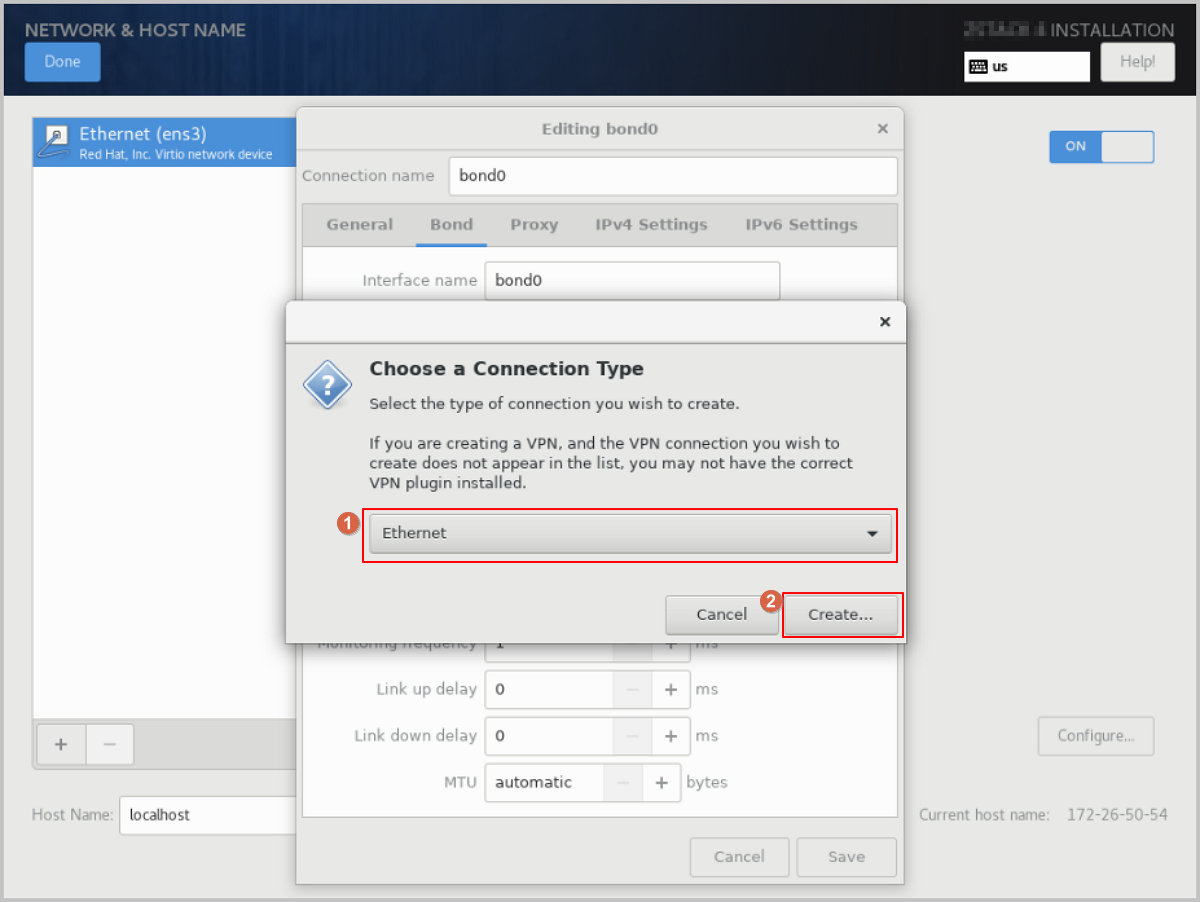
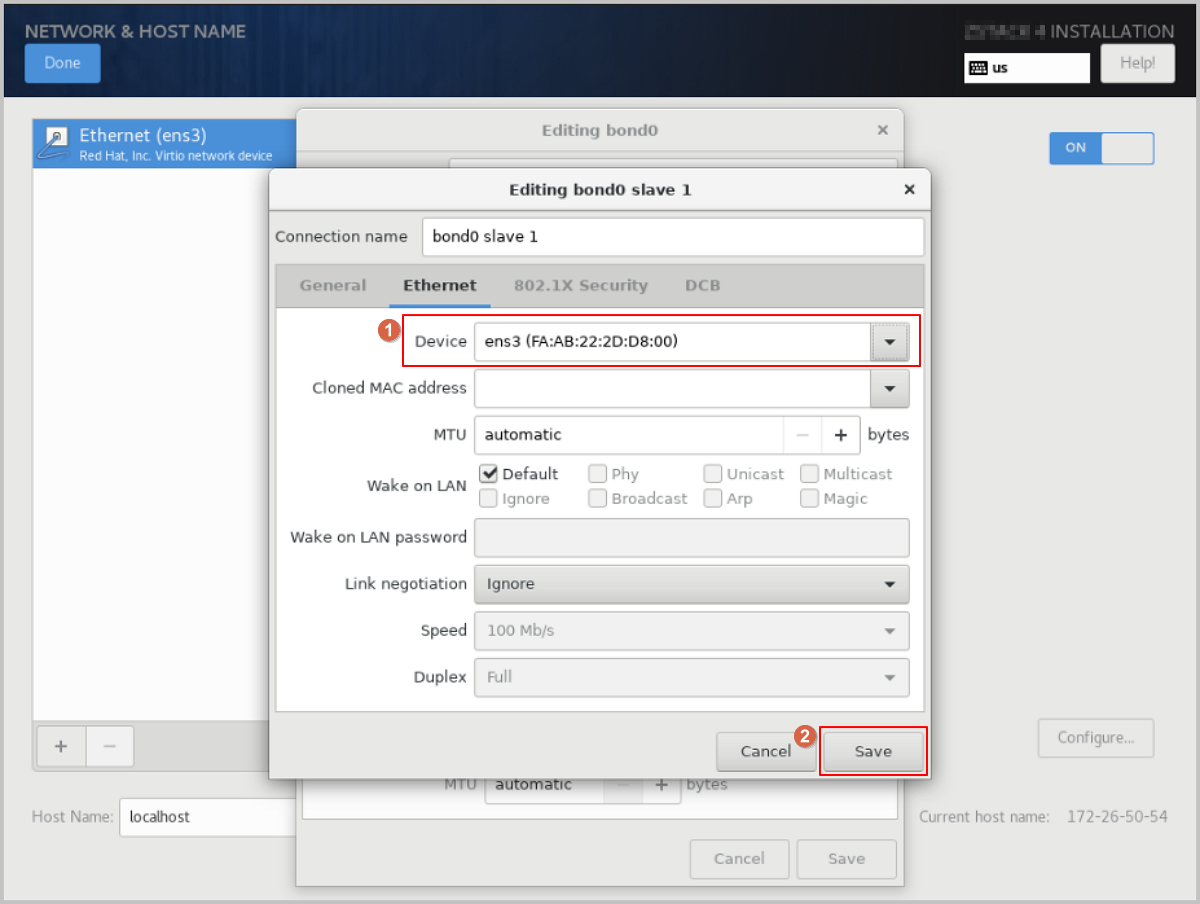
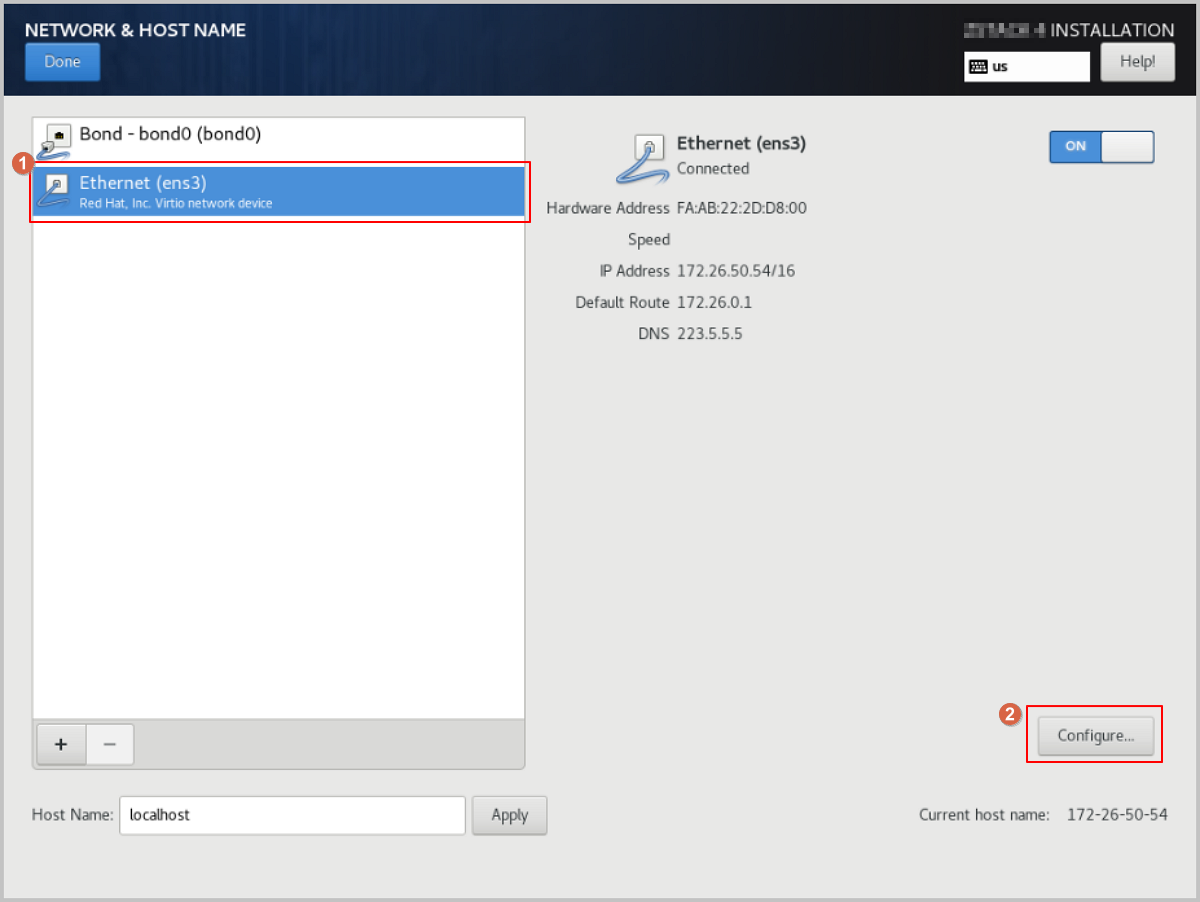
To meet the requirements for network port bandwidth capacity and high reliability, NIC bonding must be configured in production environments. Since the operating system installation process is identical for both x86 and ARM servers, this chapter uses x86 servers to introduce the detailed installation procedure.

Procedure

  1. Select the boot option.
    Enter the ISO boot interface and choose the default option to start the operating system installation. You can select based on your actual situation, but we recommend using the graphical user interface (GUI) for installation. If the server does not have a VGA port and only supports serial connections, you can use either VNC or text mode installation methods.
    • GUI method
    • VNC method
    • Text mode method
    Figure 1. System Boot


  2. Review the installation configuration summary.
    This page displays the system installation configuration. You can modify the configuration as needed. By default, ZStack ZSphere is configured with the following settings:
    • Keyboard: English (US)
    • Language Support: English (United States)
    • Time & Date: Asia/Shanghai (UTC+8). We recommend that you check the host's time in advance and configure it to the current time and time zone.
    Figure 2. System Installation Interface


  3. Select the installation mode.
    1. On the INSTALLATION SUMMARY page, click Software Selection.
    2. On the SOFTWARE SELECTION page, choose the installation mode.
      Set the servers for management nodes to ZStack ZSphere Management Node mode. Set the other servers to ZStack ZSphere Compute Node mode.
    3. After selecting the installation mode, click Done.
    Figure 3. Select Installation Mode


  4. Configure the disk partitions.
    1. On the INSTALLATION SUMMARY page, click Installation Destination to enter the INSTALLATION DESTINATION page.
    2. For Device Selection, we recommend that you only configure the system disk. After the system is installed, you can configure other disks.
    3. For Storage Configuration, we recommend selecting Automatic to automatically configure the disk partitions.
      If you need to manually configure disk partitions, refer to the following guidelines based on the BIOS boot mode:
      • UEFI Mode:
        • /boot: This directory stores the core files needed for Linux boot. We recommend allocating 1 GB of space.
        • /boot/efi: This directory stores the UEFI boot files. We recommend allocating 500 MB.
        • swap: This is the swap area. We recommend allocating 32 GB.
        • /: This is the root directory for the Linux system. We recommend allocating all remaining space.
      • Legacy Mode:
        • /boot: This directory stores the core files needed for Linux boot. We recommend allocating 1 GB of space.
        • swap: This is the swap area. We recommend allocating 32 GB.
        • /: This is the root directory for the Linux system. We recommend allocating all remaining space.
      Note:
      • The above values represent the recommended partition sizes for ZStack ZSphere (total disk capacity should be greater than 300 GB).
      • In Legacy mode, if the system disk capacity exceeds 2 TB, you need to configure a BIOS boot partition to support GPT partitioning. UEFI mode does not have this limitation and supports GPT partitioning.
    4. Review the configuration and click Done.
    Figure 4. Configure Disk Partitions


  5. Add a bond device.
    1. On the INSTALLATION SUMMARY page, click Network & Host Name.
    2. On the NETWORK & HOST NAME page, click the + button at the bottom left of the page. This will open the Add device dialog. From the drop-down list, choose Bond, then click Add.
    Figure 5. Add Bond Device


  6. Add a Bond Slave.
    1. In the Bond configuration dialog, adjust the Connection name as needed, ensuring that the Connection name matches the Interface name.
      Figure 6. Adjust Connection Name


    2. On the Bond configuration window, click Add to add a bond slave.
      Figure 7. Add Bond Slave


    3. In the Choose a Connection Type dialog, choose a connection type from the drop-down list, such as Ethernet, and then click Create....
      Figure 8. Select Bond Slave Connection Type


    4. On the Ethernet tab of the Editing bond0 slave1 dialog, click Device and select the Slave device you want to bind, such as ens3 (corresponding MAC address). Keep the other options as default or customize them as needed, then click Save.
      Figure 9. Select Bond Slave Device


  7. Select the Bond mode.
    In the Bond configuration dialog, choose the bond mode from the Mode drop-down list as needed, such as Active backup. Keep the other options as default or customize them as needed, then click Save.
    Figure 10. Select Bond Mode


  8. Disable IPv4 on the original NIC.
    1. Select the original NIC, such as Ethernet (ens3), and click Configure.
      Figure 11. Configure Original NIC


    2. The Editing ens3 dialog pops up. Click IPv4 Settings to access the IPv4 Settings tab. Change the Method parameter value to Disabled, then click Save.
      Figure 12. Disable IPv4


  9. Configure a static IP address for Bond.
    1. On the NETWORK & HOST NAME page, choose the bond device, such as Bond (bond0), and then click Configure.
    2. The Editing bond0 dialog pops up. click IPv4 Settings to access the IPv4 Settings tab. Change the Method parameter value to Manual to switch the IP address acquisition method to manual.
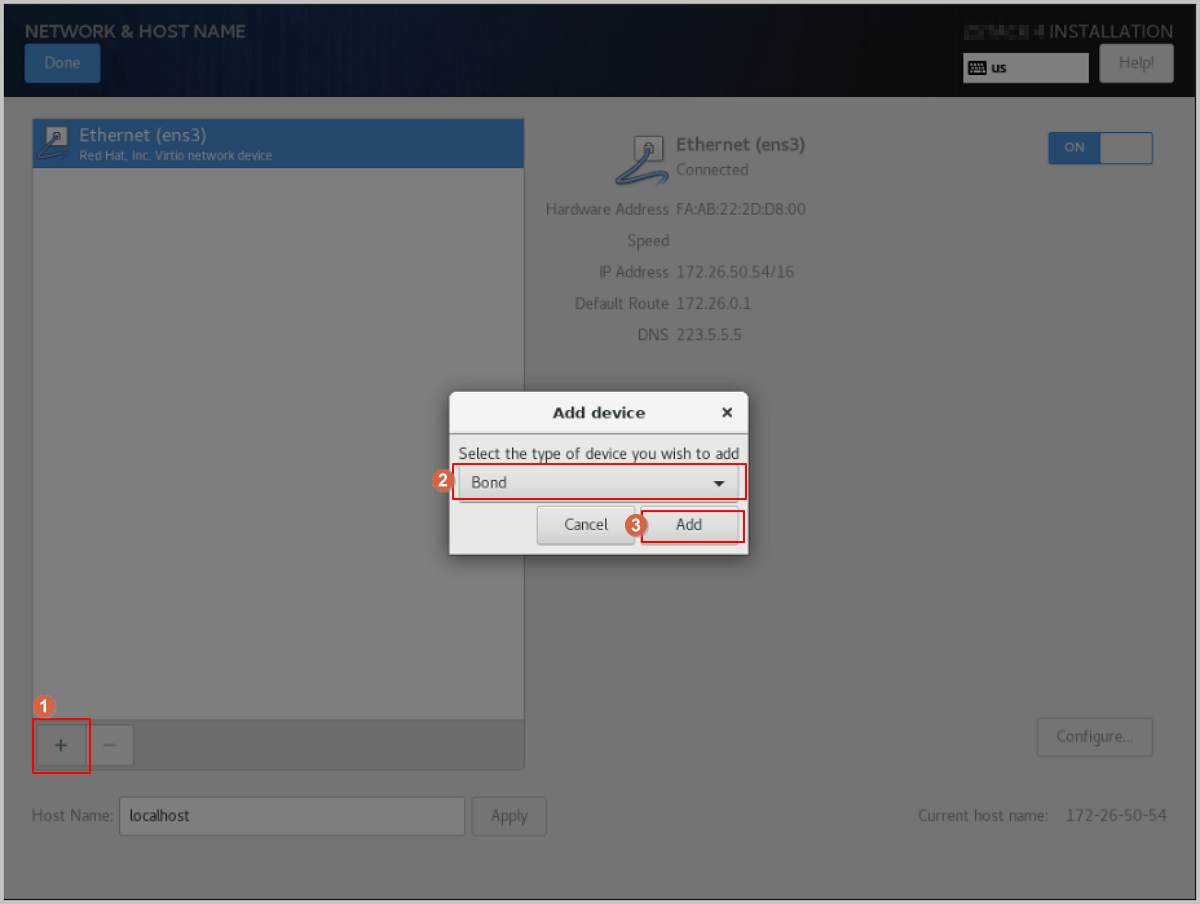
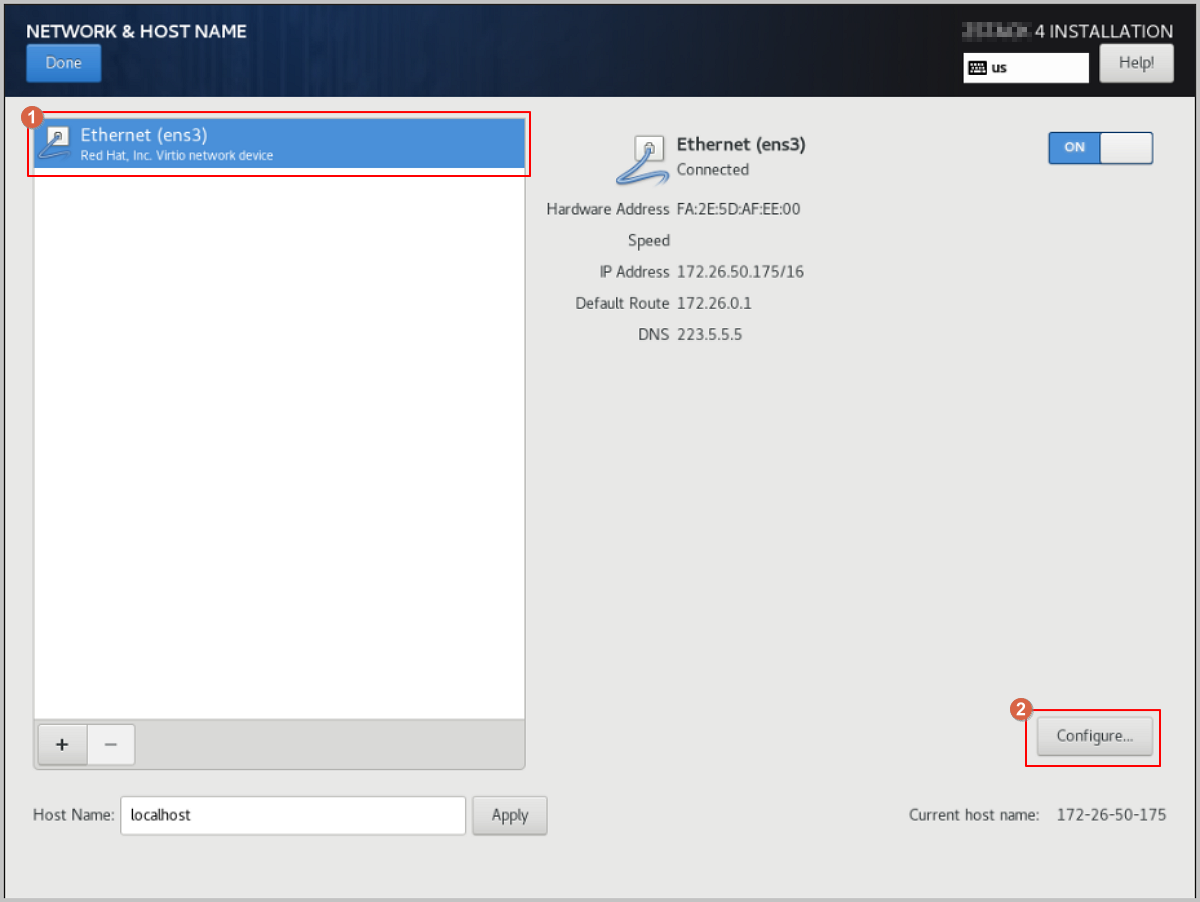
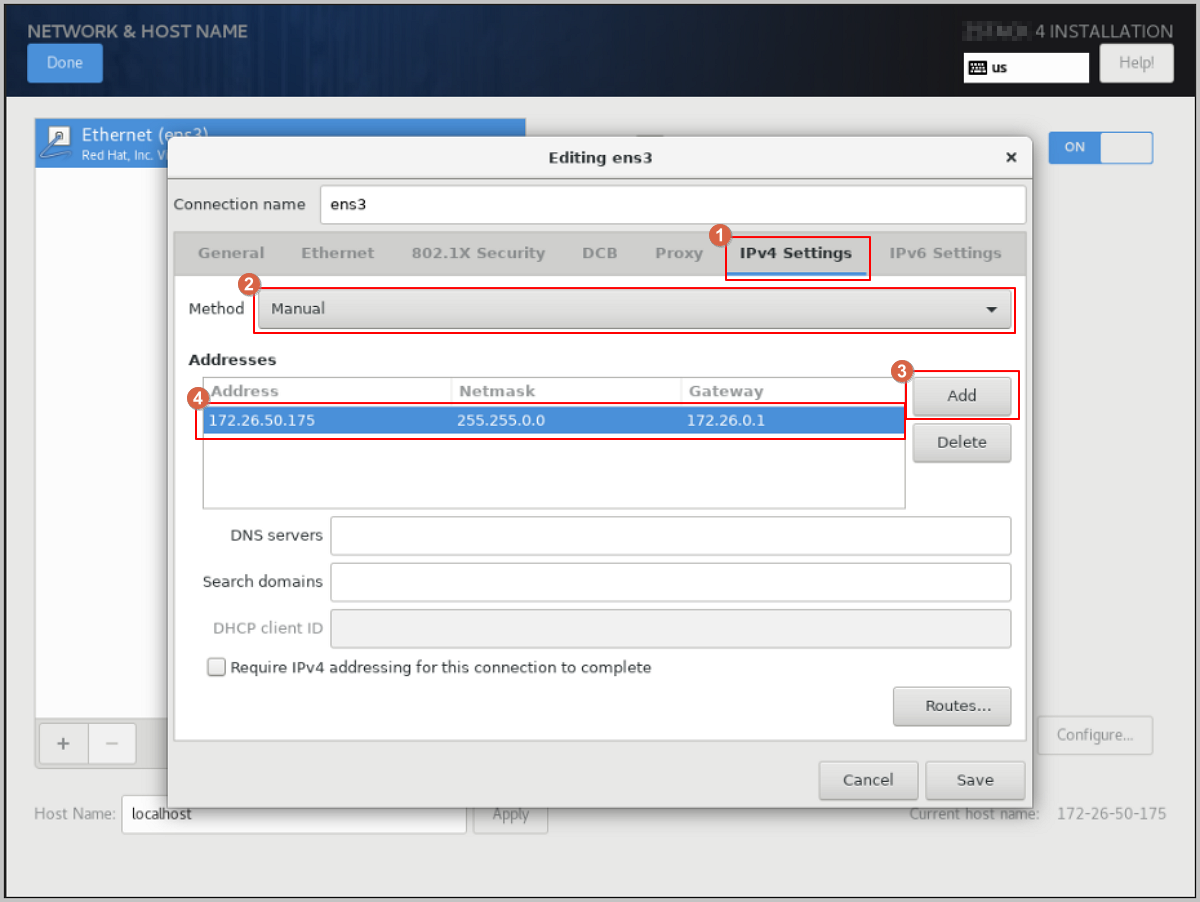
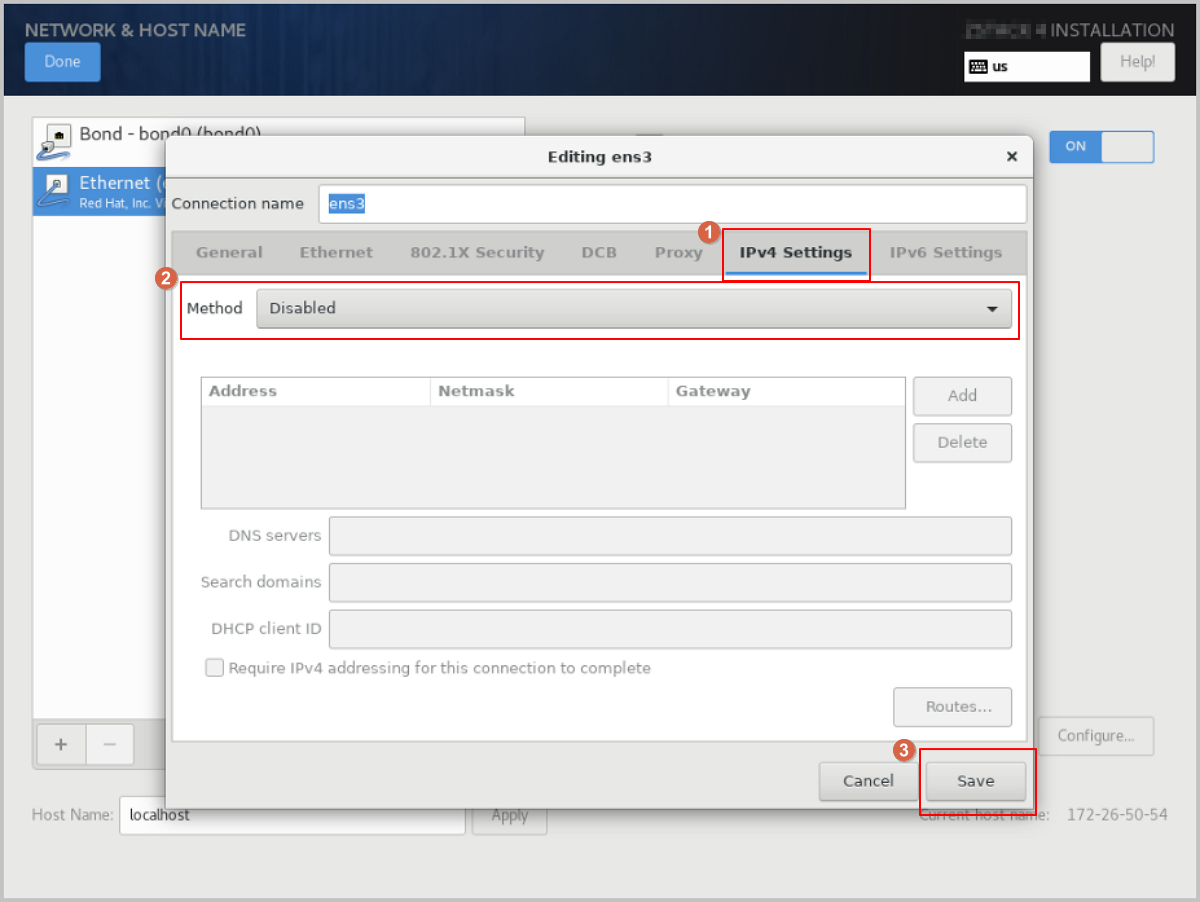
      Note: You can configure the IP address acquisition method as needed, including using DHCP for automatic acquisition or specifying it manually.
    3. Click Add to add an IP address entry. Configure the IP address, netmask, and gateway as needed, then click Save to save the configuration.
    Figure 13. Configure Bond Static IP Address


  10. Configure the NIC to activate automatically.
    In the Editing bond0 dialog, click General to access the General tab. Select the Connect automatically with priority checkbox to set the NIC to activate automatically, then click Save.
    Figure 14. Configure NIC to Activate Automatically


  11. Complete the Bond configuration.
    1. Check the Bond configuration settings. Ensure that On is enabled and that you have configured the IP address. Also, make sure the Bond Slave (such as ens3) is set to On. Otherwise, ZStack ZSphere will not be installed properly.
    2. Review the configuration and click Done to return to the INSTALLATION SUMMARY page.
    Figure 15. Check Bond Configuration


  12. On the INSTALLATION SUMMARY page, click Root Password to set the root password for the operating system.
  13. On the INSTALLATION SUMMARY page, click Begin Installation to begin installing the operating system.

Single NIC Deployment

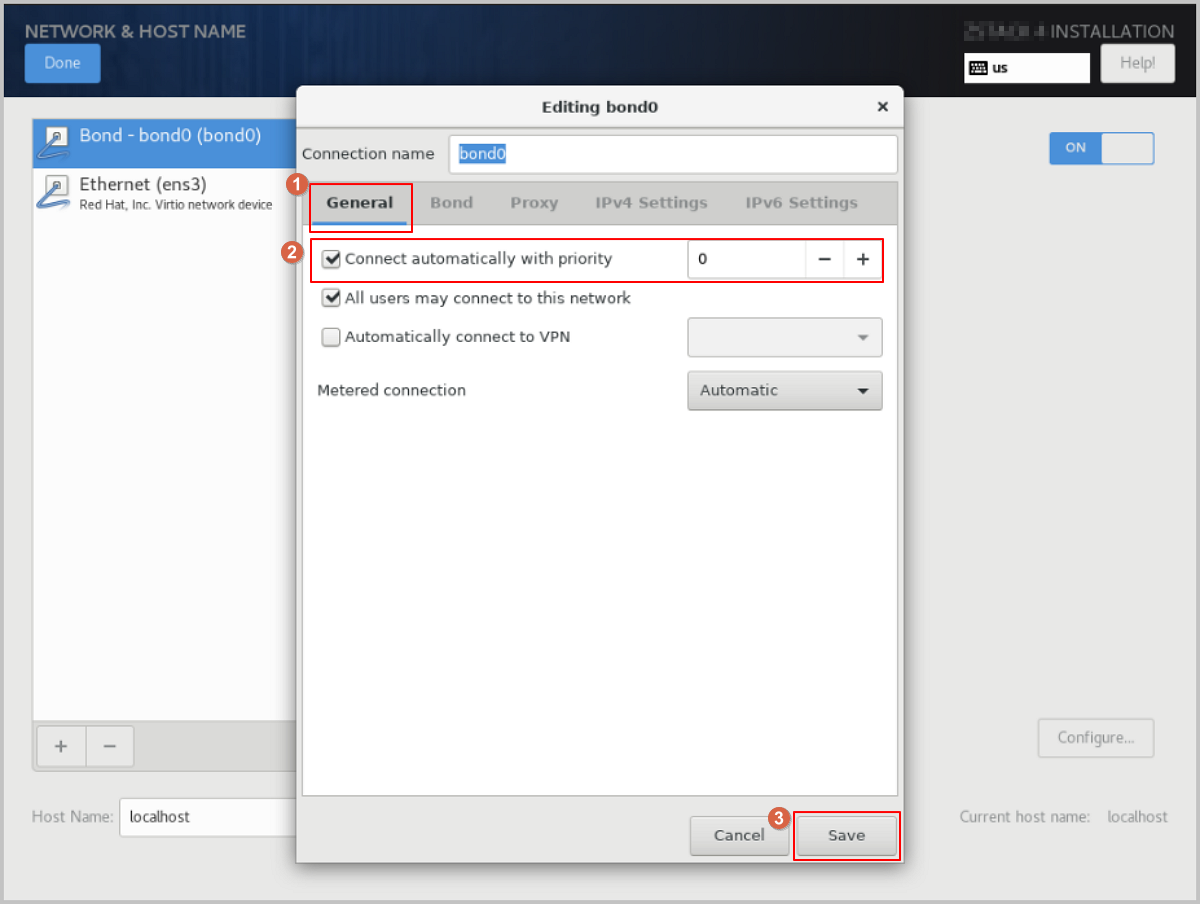
The operating system installation process is identical for both x86 and ARM servers. This chapter uses x86 servers to introduce the detailed installation procedure.

Procedure

  1. Select the boot option.
    Enter the ISO boot interface and choose the default option to start the operating system installation. You can select based on your actual situation, but we recommend using the graphical user interface (GUI) for installation. If the server does not have a VGA port and only supports serial connections, you can use either VNC or text mode installation methods.
    • GUI method
    • VNC method
    • Text mode method
    Figure 1. System Boot


  2. Review the installation configuration summary.
    This page displays the system installation configuration. You can modify the configuration as needed. By default, ZStack ZSphere is configured with the following settings:
    • Keyboard: English (US)
    • Language Support: English (United States)
    • Time & Date: Asia/Shanghai (UTC+8). We recommend that you check the host's time in advance and configure it to the current time and time zone.
    Figure 2. System Installation Interface


  3. Select the installation mode.
    1. On the INSTALLATION SUMMARY page, click Software Selection.
    2. On the SOFTWARE SELECTION page, choose the installation mode.
      Set the servers for management nodes to ZStack ZSphere Management Node mode. Set the other servers to ZStack ZSphere Compute Node mode.
    3. After selecting the installation mode, click Done.
    Figure 3. Select Installation Mode


  4. Configure the disk partitions.
    1. On the INSTALLATION SUMMARY page, click Installation Destination to enter the INSTALLATION DESTINATION page.
    2. For Device Selection, we recommend that you only configure the system disk. After the system is installed, you can configure other disks.
    3. For Storage Configuration, we recommend selecting Automatic to automatically configure the disk partitions.
      If you need to manually configure disk partitions, refer to the following guidelines based on the BIOS boot mode:
      • UEFI Mode:
        • /boot: This directory stores the core files needed for Linux boot. We recommend allocating 1 GB of space.
        • /boot/efi: This directory stores the UEFI boot files. We recommend allocating 500 MB.
        • swap: This is the swap area. We recommend allocating 32 GB.
        • /: This is the root directory for the Linux system. We recommend allocating all remaining space.
      • Legacy Mode:
        • /boot: This directory stores the core files needed for Linux boot. We recommend allocating 1 GB of space.
        • swap: This is the swap area. We recommend allocating 32 GB.
        • /: This is the root directory for the Linux system. We recommend allocating all remaining space.
      Note:
      • The above values represent the recommended partition sizes for ZStack ZSphere (total disk capacity should be greater than 300 GB).
      • In Legacy mode, if the system disk capacity exceeds 2 TB, you need to configure a BIOS boot partition to support GPT partitioning. UEFI mode does not have this limitation and supports GPT partitioning.
    4. Review the configuration and click Done.
    Figure 4. Configure Disk Partitions


  5. Start configuring the NIC.
    1. On the INSTALLATION SUMMARY page, click Network & Host Name to access the NETWORK & HOST NAME page.
    2. Select a NIC from the list on the left, such as Ethernet (ens3).
    3. Click Configure.
    Figure 5. Configure NIC


  6. Configure a static IP address for the NIC.
    1. In the Editing ens3 dialog, click IPv4 Settings.
    2. For Method, choose the IP address acquisition method as needed. For example, select Manual to specify the IP address manually.
    3. Click Add to add an IP address entry, and configure the IP address, netmask, and gateway as needed.
    Figure 6. Configure Static IP Address


  7. Configure the NIC to activate automatically.
    1. In the Editing ens3 dialog, click General, then select the Connect automatically with priority checkbox to set the NIC for automatic activation.
    2. Review the configuration and click Save.
    Figure 7. Configure NIC to Activate Automatically


  8. Complete the NIC configuration.
    1. Return to the NETWORK & HOST NAME page, and confirm that you have selected the correct NIC and that the NIC status is ON.
    2. Click Done to return the INSTALLATION SUMMARY page.
    Figure 8. Check NIC Configuration


  9. On the INSTALLATION SUMMARY page, click Root Password to set the root password for the operating system.
  10. On the INSTALLATION SUMMARY page, click Begin Installation to begin installing the operating system.


Archives

Download Document Archives

Download

Already filled the basic info?Click here.

Enter at least 2 characters.
Cannot be empty.
Invalid mobile number.
Enter at least 4 characters.
Invalid email address.
Wrong code. Try again. Send Code Resend Code (60s)

An email with a verification code will be sent to you. Make sure the address you provided is valid and correct.

同意 不同意

I have read and concur with the Site TermsPrivacy PolicyRules and Conventions on User Management of ZStack Cloud

Download

Not filled the basic info yet? Click here.

Invalid email address or mobile number.
同意 不同意

I have read and concur with the Site TermsPrivacy PolicyRules and Conventions on User Management of ZStack Cloud

Email Us

contact@zstack.io
ZStack Training and Certification
Enter at least 2 characters.
Invalid mobile number.
Enter at least 4 characters.
Invalid email address.
Wrong code. Try again. Send Code Resend Code (60s)

同意 不同意

I have read and concur with the Site TermsPrivacy PolicyRules and Conventions on User Management of ZStack Cloud

Email Us

contact@zstack.io
Request Trial
Enter at least 2 characters.
Invalid mobile number.
Enter at least 4 characters.
Invalid email address.
Wrong code. Try again. Send Code Resend Code (60s)

同意 不同意

I have read and concur with the Site TermsPrivacy PolicyRules and Conventions on User Management of ZStack Cloud

Email Us

contact@zstack.io

The download link is sent to your email address.

If you don't see it, check your spam folder, subscription folder, or AD folder. After receiving the email, click the URL to download the documentation.

The download link is sent to your email address.

If you don't see it, check your spam folder, subscription folder, or AD folder.
Or click on the URL below. (For Internet Explorer, right-click the URL and save it.)

Thank you for using ZStack products and services.

Submit successfully.

We'll connect soon.

Thank you for using ZStack products and services.