Host

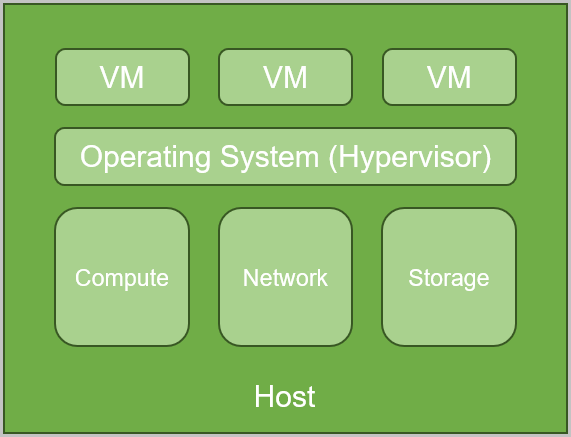
A host, also known as a compute node, is a physical server that provides VM instances with compute, network, and storage resources.
  • Hosts are core assets in ZStack. VM instances run on hosts.
As shown in Figure 1.
Figure 1. Host


Notice on Adding Hosts

When you add hosts, note that:
  • The management IP address of the management node must have access to the SSH port of the hosts to deploy agents.
  • The user name of the hosts must have the sudo permission.
  • The firewall must be enabled or iptables must be allowed for the SSH port.
  • The hardware virtualization features of Intel VMX and AMD SVM must be supported.
  • When you add or modify host information, make sure that the information matches the actual environment.
  • Hosts have a managementIp field, which indicates that when a host has multiple IP addresses, the newly added IP addresses are used by the management node to connect and deploy agents.
  • The management node periodically sends a ping command to hosts to check the health status of the channel. Once a host fails to respond, or once the ping command times out, the status of the host will become disconnected. After a host is disconnected, the status of VM instances running on the host will become unknown. After the host is reconnected, the status of VM instances on the host will be synchronized again.
  • The management node will provide a NTP time server to synchronize the time of each host.

Host Operations

  • Add host: Add a new host.
  • Enable: Enable the host that you selected.
  • Disable: Disable the host that you selected.
    Note: After you disabled a host successfully, the existing resources on the host will not be affected, but the host cannot serve as a candidate host to apply for new resources.
  • Reconnect: Reconnect the host that you selected.
    Note:
    • Generally, the reconnect operation is performed after you update the configurations of the host.
    • For example, after you update the memory or hard disk of the host, you can reconnect the host to update your database.
  • Bind tag: Bind a tag to the host.
    Note:
    • Hosts can only bind admin tags.
    • One resource can bind 50 tags at most, while a single tag can bind the unlimited number of resources.
    • Many-to-many bindings between tags and resources are supported. That is, you can bind multiple tags to multiple resources.
    • Tags that were created by a tenant can only be bound to resources owned by the tenant, while admin tags can be bound to all resources.
    • An administrator can unbind or delete tenant tags.
    • Resource tags can be sorted in order according to the creation time or tag names (priority: characters > numbers > Chinese characters > English characters). To change the sort order, choose Settings > Global Settings > Advanced, locate Tag sorting field, and click the Edit icon. By default, the tags are sorted in order by the tag name.
  • Unbind tag: Unbind a tag from the host.
    Note:
    • Multiple tags on a single resource can be unbound simultaneously. In addition, multiple resources on a single tag can also be unbound simultaneously.
    • A tenant can only unbind tags from the resources owned by the tenant itself, while an administrator can unbind tags from all resources.
  • Enter maintenance mode: Place the host in maintenance mode. In this mode, you can stop and repair the host.
    • If a host is running on a local storage primary storage, VM instances that are running on the host will be stopped after the host enters maintenance mode.
    • If a host is running on a shared storage, VM instances that are running on the host will be migrated automatically after the host enters maintenance mode.
    Note:
    • Under the shared storage scenario, after the host enters maintenance mode, you can set the VM migration policy in case of migration failure.
    • Method:
      Go to Settings > Global Settings > Advanced, locate host.maintenance.policy, and click the Edit icon.
      • If you select Stop Vm On Migration Failure, VM instances that are running on a shared storage will be automatically migrated to other hosts after the host where the VM instances reside enters maintenance mode. In addition, VM instances that fail to be migrated will be forced to stop.
      • If you select Just Migrate, VM instances that are running on a shared storage will be automatically migrated to other hosts after the host where the VM instances reside enters maintenance mode. If some VM instances are still running on the host, the host will fail to enter maintenance mode.
  • Delete: Delete the host that you selected.
    Note:
    • If you delete a host, all VM instances that are running on the host will be stopped.
    • Local storage primary storage scenario:
      • If the cluster where the host belongs is attached to a LocalStorage primary storage, all VM instances and volumes on this host will be deleted as well. Please exercise caution.
      • Even if you add a deleted host to the cloud again, the system will deploy this host again. If the previous database resource is not backed up, associated business data will not be recovered.
    • Shared storage scenario:
      • Assume that the HA Level on VM instances is set to None.

        After you delete the host where the VM instances belong, the corresponding VM instances will be stopped.

      • Assume that the HA Level on VM instances is set to NeverStop.
        If resources of other hosts permit, the VM instances with the NeverStop HA level and running on this host will be stopped firstly after you delete the host. Next, these VM instances will be migrated to other hosts and then automatically start without affecting your data security. If resources on these hosts are insufficient, the corresponding VM instances will be stopped.
        Note: Under this circumstance, a portion of VM instances might be migrated to other hosts with sufficient resources, while another portion of VM instances might be stopped due to a shortage of host resources.
      • If you delete the host, data volumes on the shared storage will not be affected.
    • Assume that you have installed the Migration Service module license. If the host is specified as a conversion host, the corresponding conversion host will be deleted as well after the host is deleted. In addition, an on-going V2V migration job on this conversion host will be automatically canceled. Please exercise caution.

Notice on Using Hosts

When you use hosts, note that:
  • The host maintenance mode is mainly used by the administrator to perform planned shutdown for host maintenance, such as adding memory, adding hard disk, and replacing NICs.
  • Assume that a host is in maintenance mode. If the primary storage is local storage, all VM instances on the host will be stopped. If the primary storage is shared storage, VM instances on the host will be automatically migrated to available hosts. If other hosts do not have sufficient resources, these VM instances will be stopped.
  • The standard procedure to add memory to a host is as follows:
    1. Put the host into maintenance mode.
    2. Wait for the automatic migration of all VM instances on the host or stop the VM instances on the host, and then perform the shutdown operation on the host.
    3. Power off the host and add memory to the host.
    4. After the host is powered on, start the host manually or through IPMI to boot the operating system.
    5. Set the status of the host to enabled.
  • After a host is disabled, the existing running VM instances will remain running. If these VM instances are stopped, they cannot be started by using the host.
  • After a host is disabled or enters maintenance mode, this host can no longer be used as a candidate to apply for new resources. It can be used only after it is enabled again.
  • A host can be deleted only after it is disconnected or enters maintenance mode.
  • After you delete a host on a local storage, all VM instances or volumes on this host will also be deleted. Note that this delete operation only removes the information about the host, VM instances, and volumes recorded in ZStack. The actual data will not be deleted.
  • When you delete a host on a shared storage, the VM instances or volumes on the host will not be directly deleted. Note that these resources can be enabled or used on other hosts.
  • After you delete a host, even if you add it back again, the system will not recognize the deleted VM instances. Please exercise caution.
  • If you want to use the GPU passthrough functionality, make sure that VT-d is enabled for the host BIOS. When you add a host, check the IOMMU option to scan IOMMU devices. The GPU passthrough functionality can be used only when IOMMU is enabled and ready.

Host Maintenance Troubleshooting Items

If an exception occurs during the host maintenance, troubleshot the following items:
  • Management node logs:

    In the management node, check whether /usr/local/zstack/apache-tomcat/logs/management-server.log is abnormal.

  • Host agent process:

    On a host, check ps -ef|grep kvmagent to determine whether the KVM agent is working properly.

  • Host logs:

    On a host, check whether /var/log/zstack/zstack-kvmagent.log is abnormal.

  • Host libvirt status:

    On a host, check whether service libvirtd status is abnormal.

  • Host system logs:

    On a host, check whether /var/log/messages is abnormal.

  • Connection between hosts and primary storages:

    Check whether the connection between hosts and primary storages is abnormal.


Single Host Maintenance

Change Host Password

  • Via UI:
    1. Log in to the Cloud, go to the details page of a host, and click the edit icon next to the Password field to change the host password.
    2. Reconnect the host manually for the new password to take effect.
  • Via CLI:
    1. Run the following command to log in to the Cloud as an administrator:
      [root@localhost ~]# zstack-cli admin>> LogInByAccount accountName=admin password=PASSWORD   # Here, PASSWORD is the login password.
    2. Run the following command to change the host password:
      admin>> UpdateKVMHost uuid=HOST_UUID password=NEW_PASSWORD   # Here, HOST_UUID is the host UUID, and NEW_PASSWORD is the new password.

Enable Host IOMMU

To make the IOMMU take effect, you need to enable Intel VT-d or AMD IOMMU for a host. The method is as follows:
  • Log in to the Cloud via the UI. On the Basic Attributes tab of the host details page, set IOMMU State to Enable. Then, restart the system and specify a host to enable IOMMU.

Bulk Host Maintenance

Add Hosts in Bulk

ZStack Enterprise allows you to add hosts in bulk via UI or CLI. The methods are as follows:
  • Via UI
    1. Log in to ZStack via the UI. On the Add Host page, select Use Import to add hosts.
    2. Click Download Template to download the template and fill in the template according to your needs.
    3. After you fill in the template, add it to ZStack and click OK.
    For more information, see Add Host in the User Guide.

Configure Password-Free Access on Hosts in Bulk

To configure password-free access, time synchronization, and hostname, follow these steps:
  1. Run the following commands to prepare a password-free package:
    [root@localhost ~]# wget http://cdn.zstack.io/tools/zstack_tools.tar.gz  #Download the tool package. [root@localhost ~]# tar zxvf zstack_tools.tar.gz   #Decompress the tool package. [root@localhost ~]# cd zstack_tools/   #Go to the directory where the tool package is stored.
  2. Modify the configurations in ansible/hosts.example.
    Note:
    • The management IP addresses of all nodes are listed under [nodes].
    • ansible_user indicates the SSH user name.
    • ansible_pass indicates the SSH password.
    • The initial password of each host must be the same. After you list the time synchronization servers to be configured under [chrony], the script will automatically configure this node as a time synchronization server.
    [root@localhost zstack_tools]# vim ansible/hosts.example #Make the modifications as follows: #Node IP [nodes] 10.10.0.11 10.10.0.12 10.10.0.13 #Node user/password [nodes:vars] ansible_user=root ansible_ssh_pass=password #Time synchronization server [chrony] 10.10.0.13 #Save and exit. Edit the hostname prefix. Modify the hostname prefix under ansible/group_vars/nodes. vim ansible/group_vars/nodes #Make the modifications as follows:  hostname_prefix: ceph- #Save and exit. Then, the prefix of each hostname will be configured in a specified format, such as ceph-1 and ceph-2.
  3. Run the following command to prepare the environment in one click. The following script will configure password-free SSH access between different nodes, time synchronization, and /etc/hosts. This script will also disable the firewall.
    [root@localhost ~]# ./prepare.sh -i ./ansible/hosts.example

Change System Password and Platform Password in Bulk

This section describes how to change the system password and platform password of hosts in bulk. Note that this operation applies to KVM hosts only. To perform this operation, make sure that hosts added to the Cloud use the root user.
  • Method 1:
    1. Run the following command to log in to the Cloud as an administrator:
      [root@localhost ~]# zstack-cli admin>> LogInByAccount accountName=admin password=PASSWORD   # Here, PASSWORD is the login password.
    2. In the management node, run the following commands to change the root password of hosts in bulk:
      admin>> QueryHost fields=managementIp, "hypervisorType"=KVM admin>>  for i in $(zstack-cli QueryHost fields=managementIp, hypervisorType=KVM|awk -F "\"" '/managementIp/ {print $4}'); do \ ssh $i -i \ /usr/local/zstack/apache-tomcat/webapps/zstack/WEB-INF/classes/ansible/rsaKeys/id_rsa 'echo "NEW_PSAAWORD" | passwd --stdin root';  done    #Here, NEW_PSAAWORD is the new password.
  • Method 2:
    1. In the management node, run the following commands to change the platform password of hosts in bulk:
      [root@localhost ~]# for i in $(zstack-cli QueryHost fields=uuid, hypervisorType=KVM|awk -F "\"" '/uuid/ {print $4}')  [root@localhost ~]# do zstack-cli UpdateKVMHost uuid=$i password=NEW_PSAAWORD   #Here, NEW_PSAAWORD is the new password. [root@localhost ~]# done

Create Sudo Users for Hosts and Change User Names and Passwords in Bulk

This section describes how to create sudo users for hosts and change user names and passwords in bulk. Note that this operation applies to KVM hosts only. To perform this operation, make sure that hosts added to the Cloud use the root user.
  • Method 1: In the management node, run the following command to create test users in bulk, and change the password of the test users with the sudo permission to NEW_PSAAWORD.
    [root@localhost ~]# zstack-cli LogInByAccount accountName=admin password=password admin>>  for i in $(zstack-cli QueryHost fields=managementIp, hypervisorType=KVM|awk -F "\"" '/managementIp/ {print $4}');  do \ ssh $i -i \ /usr/local/zstack/apache-tomcat/webapps/zstack/WEB-INF/classes/ansible/rsaKeys/id_rsa \ 'adduser test;echo "NEW_PSAAWORD" | passwd --stdin test;echo "test   ALL=(ALL)       NOPASSWD: ALL" >>/etc/sudoers;'   #Here, NEW_PSAAWORD is the new password. admin>>  done
  • Method 2: In the management node, run the zstack-cli commands to change the user name and password of hosts in bulk to NEW_NAME and NEW_PSAAWORD, respectively.
    [root@localhost ~]# for i in $(zstack-cli QueryHost fields=uuid, hypervisorType=KVM|awk -F "\"" '/uuid/ {print $4}') [root@localhost ~]# do [root@localhost ~]# zstack-cli UpdateKVMHost uuid=$i password=password123 username=test [root@localhost ~]# done


Back to Top

Download

Already filled the basic info?Click here.

Enter at least 2 characters.
Invalid mobile number.
Enter at least 4 characters.
Invalid email address.
Wrong code. Try again. Send Code Resend Code (60s)

An email with a verification code will be sent to you. Make sure the address you provided is valid and correct.

Download

Not filled the basic info yet? Click here.

Invalid email address or mobile number.

Email Us

contact@zstack.io
ZStack Training and Certification
Enter at least 2 characters.
Invalid mobile number.
Enter at least 4 characters.
Invalid email address.
Wrong code. Try again. Send Code Resend Code (60s)

Email Us

contact@zstack.io
Request Trial
Enter at least 2 characters.
Invalid mobile number.
Enter at least 4 characters.
Invalid email address.
Wrong code. Try again. Send Code Resend Code (60s)

Email Us

contact@zstack.io

The download link is sent to your email address.

If you don't see it, check your spam folder, subscription folder, or AD folder. After receiving the email, click the URL to download the documentation.

The download link is sent to your email address.

If you don't see it, check your spam folder, subscription folder, or AD folder.
Or click on the URL below. (For Internet Explorer, right-click the URL and save it.)

Thank you for using ZStack products and services.

Submit successfully.

We'll connect soon.

Thank you for using ZStack products and services.