Migration Service

ZStack provides the V2V Migration Service, allowing you to migrate VM systems and data from other virtualization platforms to the current cloud. Currently, with the V2V Migration Service, you can:
  • Migrate VM instances from the vCenter that you took over to the current cloud. The supported versions of the source vCenter platform include 5.0, 5.1, 5.5, 6.0, 6.5, and 6.7. Note that the version of vCenter Server must be consistent with that of ESXi Host.
  • Migrate VM instances from a KVM cloud platform to the current cloud.
As shown in V2V Migration.
Figure 1. V2V Migration


The V2V Migration Service is a separate feature module. To use this feature, you need to purchase both the Base License and the Plus License of the V2V Migration Service. The Plus License cannot be used independently.

With the V2V Migration Service, you can:
  • Perform one-click V2V migrations in bulk for VM instances.
  • Only need to add a conversion host and create a V2V job. The cloud will do the rest of your work.
  • Configure an independent migration network and a network QoS for a conversion host to control transmission bottlenecks and to improve migration efficiencies.
  • Customize configurations for destination VM instances when you create a V2V job.
  • Monitor and manage the entire migration process in the visualized, well-designed UI.

V2V Migration

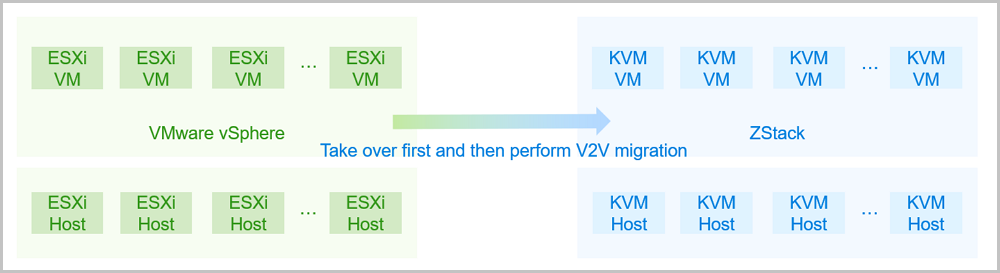
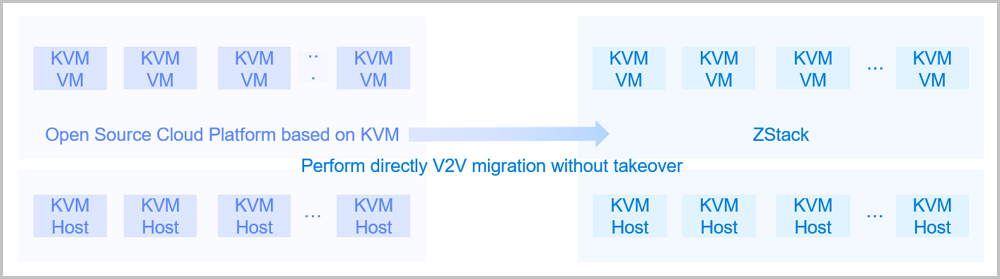
Currently, the V2V Migration Service allows you to migrate VM instances from a VMware cloud platform or a KVM cloud platform to the current cloud.

Source Cloud Platform: VMware

By creating V2V migration jobs, you can migrate VM instances from the vCenter that you took over to the current Cloud.
  • Before migrations, perform data synchronization on the vCenter that you took over to manually synchronize the latest status of vCenter resources.
  • You can perform bulk V2V migrations for VM instances, and customize configurations of the destination VM instances to be migrated.
  • The supported versions of the source vCenter platform include 5.0, 5.1, 5.5, 6.0, 6.5, and 6.7. Note that the version of vCenter Server must be consistent with that of ESXi Host.
  • The supported systems of source vCenter VM instances include RHEL/CentOS 4.x, 5.x, 6.x, 7.x, SLES 11, 12, 15, Ubuntu 12, 14, 16, 18, and Windows 7, 2003, 2008, 2012, 2016.
  • The VM instances will be forced to shut down during the V2V migration process. Therefore, pay attention to the business impact.
    Note: The system firstly attempts to shut down the VM instances softly. If the shutdown fails, the system will shut down the VM instances forcibly.
  • The type of the source primary storage is not enforced. The type of the destination primary storage can be LocalStorage, NFS, Ceph, and Shared Block.
  • For Windows VM instances, the Windows VirtIO driver is automatically installed during the migrations, which improves the NIC and disk efficiencies.
  • You can perform V2V migration for VM instances booted by UEFI. After migrations, these VM instances are also booted by UEFI.
When you migrate VM instances from the vCenter that you took over to the current Cloud, note that:
  • During the V2V migration process, do not power on the source vCenter VM instances that were stopped. Otherwise, the migration might fail.
  • During the V2V migration process, do not restart the V2V conversion host. Otherwise, the migration might fail.
  • After the V2V migration is completed, the number of drivers from which the destination VM instances are started will be set according to the number of source VM drivers. Currently, up to three drivers can be set.
  • Assume that you enabled the switch for automatically starting VMs after migration. If the physical resources in your destination cluster are insufficient, the destination VM instances will fail to start and enter the stopped state. At this time, the status of the V2V job is displayed as Succeeded.
  • For Windows VM instances, the Windows VirtIO driver is automatically installed during the migration process. You need to manually update the driver after migration. Note that the Windows VirtIO driver will be installed in the local directory, and you can search for it and then update it.
  • For Windows VM instances that have volumes, the volumes are in offline mode after migration. You need to manually change the mode to online.
  • For Linux and Windows VM instances that have volumes, the drive letter of the volumes might be modified after migration. You need to manually modify the drive letter according to the drive letter order of the source VM instances. We recommend that you record the drive letter order of the source VM instances before migration.
  • For Linux and Windows VM instances whose volumes are in SCSI mode, the volume mode can be automatically recognized during the migration process. You can set the volume mode for the destination VM instances after migration.
    • For Windows VM instances, the volume mode defaults to non-VirtioSCSI after migration.
    • For Linux VM instances, the volume mode defaults to VirtioSCSI after migration.
      Note:

      If the kernel version is relatively old, such as RHEL5 (kernel 2.x), the volumes cannot be in VirtioSCSI mode. You need to manually change the volume mode to non-VirtioSCSI after migration.

      For example, if a destination VM instance fails to start after migration, and an error "Cannot find hard disk" is reported, and the kernel version is relatively old (such as kernel 2.x), the reason may be that the old version of the Virtio driver does not support SCSI. In this case, you need to manually change the volume mode to non-VirtioSCSI. Then, the VM instance can enter the system after restart.

  • For Linux VM instances, if these VM instances were started in GUI mode before migration, you might need to update the display configuration of the VM instances for the first startup after migration.
  • For Linux VM instances that are booted by UEFI and whose system version is RHEL/CentOS 5.x, 6.x, or 7.x, you need to delete the rhgb parameter in the startup option for the VM instances to start successfully after migration.
  • For Linux VM instances that are booted by UEFI and whose version is CentOS 7.4 or later, the VM instances will enter the UEFI Shell if you start them after migration. To enter the operating system, run the following commands:
    Shell> fs0: FS0:\> cd EFI FS0:\EFI\> cd centos FS0:\EFI\centos\> shimx64-centos.efi
    If you want the VM instances to automatically enter the operating system instead of the UEFI Shell upon restart, run the vim /boot/efi/startup.nsh command to create a script and save the following content:
    FS0: CD EFI CD centos shimx64-centos.efi
  • You can set the maximum number of V2V jobs that can run at a time. The method is as follows:

    Go to Settings > Global Settings > Advanced, locate ParallelismDegree, and click the Edit icon. The default value is 10.

  • You can set the host allocator strategy for starting the destination VM instances after migration. The method is as follows:

    Go to Settings > Global Settings > Advanced, locate HostAllocatorStrategy, and click the Edit icon. The default option is Host with min. running VMs.

Source Cloud Platform: KVM

By creating V2V migration jobs, you can migrate VM instances from a KVM cloud platform to the current cloud.
  • You can perform bulk V2V migrations for VM instances, and customize configurations of the destination VM instances to be migrated.
  • You can migrate the VM instances that are running or paused. Do not power off the VM instances that need to be migrated.
  • You can perform V2V migrations for VM instances booted by UEFI. After migrations, these VM instances are also booted by UEFI.
  • The type of the source primary storage is not enforced. The type of the destination primary storage can be LocalStorage, NFS, Ceph, and Shared Block.
  • For different types of source primary storage or destination primary storage, the libvirt version and QEMU version must meet the following requirements:
    • If either the source primary or destination primary storage is Ceph, use libvirt 1.2.16 and QEMU 1.1 or their later versions.
    • If neither the source primary storage nor destination primary storage is Ceph, use libvirt 1.2.9 and QEMU 1.1 or their later versions.
When you migrate VM instances from a KVM cloud platform to the current cloud, note that:
  • For VM instances with high I/O, we recommend that you pause them before migration to ensure the data integrity. When you perform V2V migrations for VM instances that undergoing high I/O operations, a portion of data in the memory might not be saved to hard disks. In this case, this portion of data might be lost after V2V migration.
  • During the V2V migration process, do not power the source VM instances.
  • During the V2V migration process, do not restart the V2V conversion host. Otherwise, the migration might fail.
  • After the V2V migration is completed, you need to manually start the source VM instances that were paused.
  • Assume that you enabled the switch for automatically starting VMs after migration. If the physical resources in your destination cluster are insufficient, the destination VM instances will fail to start and enter the Stopped state. At this time, the status of the V2v job is displayed as Succeeded.
  • You can set the maximum number of V2V jobs that can run at a time. The method is as follows:

    Go to Settings > Global Settings > Advanced, locate ParallelismDegree, and click the Edit icon. The default value is 10.

  • You can set the host allocator strategy for starting the destination VM instances after migration. The method is as follows:

    Go to Settings > Global Settings > Advanced, locate HostAllocatorStrategy, and click the Edit icon. The default option is Host with min. running VMs.


V2V Conversion Host

To perform V2V migrations, specify a host in a destination cluster as the V2V conversion host.
  • A V2V conversion host must have sufficient hardware resources, such as network bandwidth and disk space. The following table lists the minimum configuration requirements.
    Table 1. Minimum Configuration Requirements for V2V Conversion Host
    Hardware Configuration Requirements
    CPU Minimum 8 cores
    Memory Minimum 16 GB
    Network Minimum 1 Gigabyte NIC
    Storage Minimum 50 GB for the rest of storage spaces
    Note: You can modify the storage configuration according to the number of VM instances to be migrated.
  • The type of the V2V conversion host must be consistent with that of the source cloud platform.
  • You can set an independent migration network and a network QoS for a V2V conversion host to control transmission bottlenecks and to improve migration efficiencies.

Notice

  • Before you create a V2V job, you need to add a V2V conversion host to the cloud.
  • The V2V conversion host is a host in a target cluster. Make sure that the host has sufficient hardware resources for V2V migration.
  • The type of the V2V conversion host must be consistent with that of the source cloud platform.
  • A host cannot be used as both a VMware V2V conversion host and a KVM V2V conversion host.
  • If multiple source VM instances were selected, the V2V jobs created accordingly will use the same V2V conversion host.
  • During the V2V migration, the VM system and data are first cached in the V2V migration host, and then imported into the target primary storage.
  • If a V2V conversion host is disabled when the V2V jobs are being performed, the migration will not be affected.
  • Deleting a V2V conversion host will automatically cancel the ongoing V2V jobs. However, the resources that have been migrated will not be affected.

Back to Top

Download

Already filled the basic info?Click here.

Enter at least 2 characters.
Invalid mobile number.
Enter at least 4 characters.
Invalid email address.
Wrong code. Try again. Send Code Resend Code (60s)

An email with a verification code will be sent to you. Make sure the address you provided is valid and correct.

Download

Not filled the basic info yet? Click here.

Invalid email address or mobile number.

Email Us

contact@zstack.io
ZStack Training and Certification
Enter at least 2 characters.
Invalid mobile number.
Enter at least 4 characters.
Invalid email address.
Wrong code. Try again. Send Code Resend Code (60s)

Email Us

contact@zstack.io
Request Trial
Enter at least 2 characters.
Invalid mobile number.
Enter at least 4 characters.
Invalid email address.
Wrong code. Try again. Send Code Resend Code (60s)

Email Us

contact@zstack.io

The download link is sent to your email address.

If you don't see it, check your spam folder, subscription folder, or AD folder. After receiving the email, click the URL to download the documentation.

The download link is sent to your email address.

If you don't see it, check your spam folder, subscription folder, or AD folder.
Or click on the URL below. (For Internet Explorer, right-click the URL and save it.)

Thank you for using ZStack products and services.

Submit successfully.

We'll connect soon.

Thank you for using ZStack products and services.